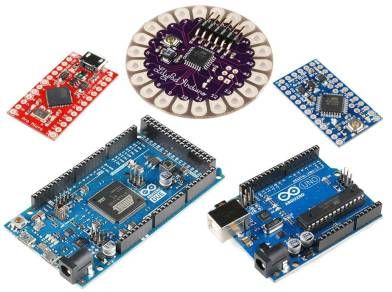
As we all known,these are too many Arduino Board to choose.sometimes we may be messed with them.so today we learn something about Arduino Board.

This instructable will help you to choose the right Arduino board for your projects and for your beginning in Arduino field.
There are a lot of arduino variants ,so the differences between them are highlighted here.
And for beginners, we will also help you in choosing the right board to get started using this tutorial.
Step 1: The Story behind Arduino :

What is Arduino?
Arduino is a board used for making computers that can interact with the environment, sense various data from the environment with the use of sensors and control devices like lights, motors, etc.
The main point here that It’s an open source platform based on AVR microcontrollers. The term Open Source indicates that all the resources for the board including the design files, CAD files etc are free and open to all.
This means anyone can modify it according to their need if you’r a little bit expert you can make your own with some copyright rules.
Arduino was designed by Italian scientists to provide an inexpensive and easy way for students and professionals to create microcontroller computers that can interact with the physical environment.
Arduino has gone viral among makers and enthusiasts with its simple design. It has two segments; a hardware part which includes the Arduino board and the software part which includes the Arduino IDE.
The IDE (Integrated Development Environment)is a simple and easy to learn software for writing Arduino programs. The simplicity of Arduino has made it so popular that almost all maker events have at least one project based on it like Maker Faire and Egypt Mini Maker Faire 2015.
What you can do with Arduino?
Arduino has huge flexibility with which you can make almost anything you imagine (as they say :D) .
It can be easily connected to a variety of modules like fire sensors, obstacle sensors, presence detectors, GPS modules, GSM Modules or anything with which you wish to give wings to your dream project. You can find many Arduino projects in the Arduino hacks sites on internet .
Where to learn Arduino?
buy downloading or buying Arduino Internals book.
How to select the right board for your need?
As Arduino is an open source platform anyone can make Arduino compatible boards. Many such boards are available in the market like the FreeDuino and NetDuino. One way to differentiate between original boards and the compatible models is to look for the trade name on the board. The name Arduino is trademarked and reserved for boards made from the original patent company in Italy. All compatible Arduino boards use a different but look alike trade name like Freeduino, Netduino, etc. If you want a cheaper alternative of the arduino, you can always buy the clone boards which I don’t recommend for various reasons one of them that some clones get bug in code for no reason or restart without reason.
The best way to get cheap arduino boards is to buy them online from sites like: Ebay, Amazon, Sparkfun, etc. They are also available in your city’s local electronics stores, so give them a call and confirm the same before going over. Along with the Arduino Uno, which is the best starter to the Arduino world, there are also other versions that can be found in the market. Since specifications vary, you should choose the board for your Arduino projects wisely. The different boards and their specifications are given in the table below.
Step 2: The Table :
In this step you will find the attached Technical Specifications for :
Table For Arduino Boards Specification
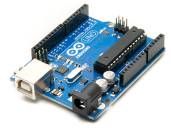
Step 3: Comparing : (Arduino UNO)
To bring your Arduino projects to life or to step into the world of Arduino, it is better to get started with the most commonly used versions such as the Arduino Uno, Arduino Mega or the Arduino Mini , as these have greater support available online than others.
Comparing the basic ones,
Arduino Uno: If you are a beginner trying to get into the world of Arduino, the best option for you would be the Arduino Uno R3 which costs around $21.16 + VAT. Or you can also buy clone boards like freeduino which you could buy for less than Arduino half price, Arduino has 14 Digital pins and 6 Analog pins. So you have a total of 20 GPIO pins (General Purpose Input Output pins), which is good enough for much of the beginner and intermediate level projects. It also has a pair of Rx and Tx pins to connect Serial Communication Devices. Apart from that a separate pair of Rx and Tx pins can be defined by including the header file SoftwareSerial.
The Arduino Uno R3 comes in two models; the normal version and the SMD version. In the SMD version you have the Atmega328 controller IC as an SMD chip soldered into the board, whereas in the normal version the IC is held on the Arduino by an IC Holder. The better option for beginners would be the Normal version. Even if you fry your controller IC accidently while working on your project, you may restore normal working by just replacing the IC. If you have an SMD Arduino, then you may end up replacing the Arduino board if you get the IC fried up.
Step 4: Comparing : (Arduino Mini)
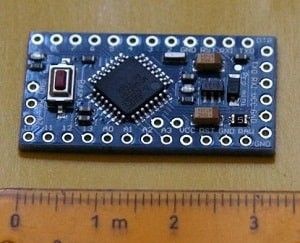
Arduino Mini: If you are looking to get a cheaper intro into the field, or if you need your product in a smaller size, then you may go for the Arduino mini. It has all the functionalities of the Arduino Uno in a smaller size and is cheaper than the UNO. The mini has a length of about 3 cm and is hence suitable for compact projects like small robots. But in the mini version, you still have the problem of the controller IC being surface mounted on the board.
Step 5: Comparing : (Arduino Mega)
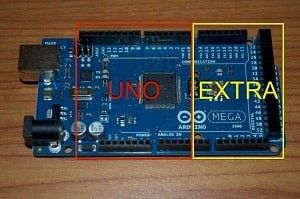
Arduino Mega: If your Arduino project has a lot of wires running all around, which requires more than 20 pins, you can opt for an Arduino mega. Say you are working on a 5×5 LED Cube which has a total of 30 inputs. Then you may find the Arduino Uno or the Mini insufficient with 20GPIO pins. In such cases you may either use a Decoder IC74595 to increase the number of pins on your Arduino Uno or you may buy an Arduino Mega instead, which reduces the fuss of extra wires, PCBs or ICs. To make your project simpler and easier in such scenarios, you may even go for an Arduino Mega 2560. The Arduino mega has 4 pairs of Tx and Rx pins so that you may connect more serial communication devices.
Step 6: Special Board : LilyPad
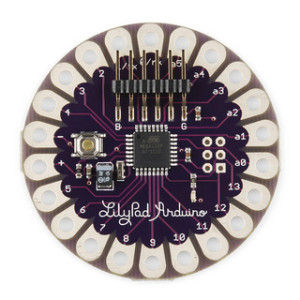
Arduino Lilypad: This variant of the arduino board is primarily used for arduino projects that are embedded into clothing. Here, the board is designed in such a way that it can be easily stitched on to textiles and fabrics. There are also specially designed sensors and components for this board. Here, special conductive thread is used instead of connecting wires. So, if you want a sleek board that needs to be integrated into your clothing, Arduino Lilypad is the best option.
Step 7: To sum it all up :
Which board to choose for your Arduino Projects?
To summarize, an Uno or Mini can be chosen for small and simple Arduino projects depending upon your size and cost limits. Or if you have a need for greater number of pins or serial communication devices to be processed with the same controller you can go for the Arduino Mega. And for a beginner, the Arduino Uno is the most recommended board to get started. Now go ahead and grab your first board and share your Arduino projects with me 😉
if you want to learn more or to buy,here are something you may be interested in.
This article published by the m.tech.s3 on instructables.