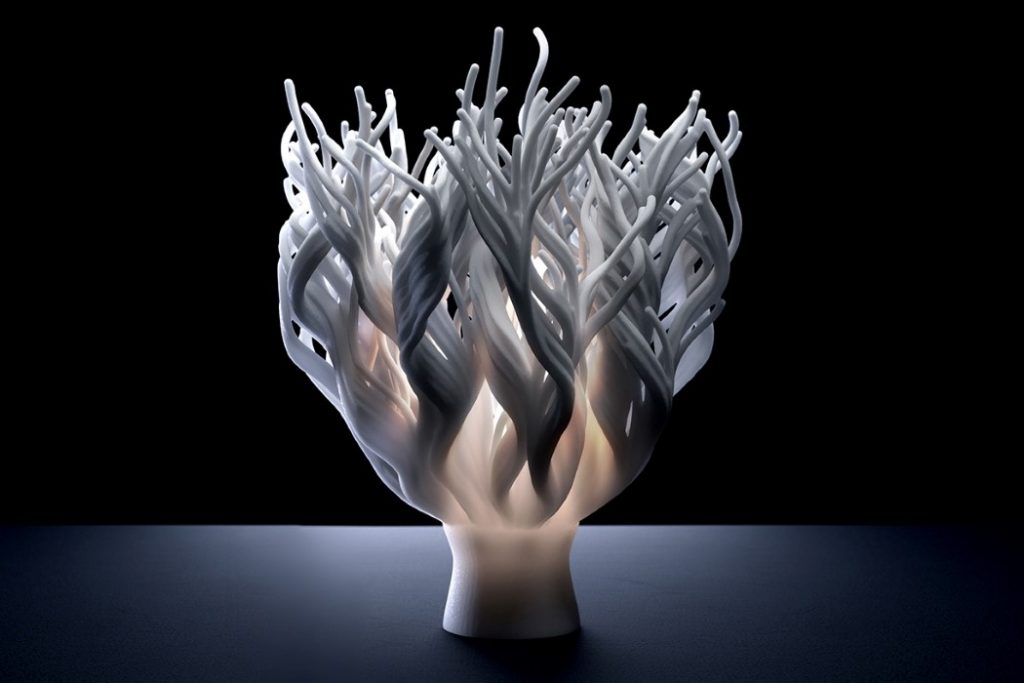
Industrial designer John Mauriello,based in San Francisco,broke the conventional thinking and put the effort into his Coral Lamp Lighting Collection with something else entirely.
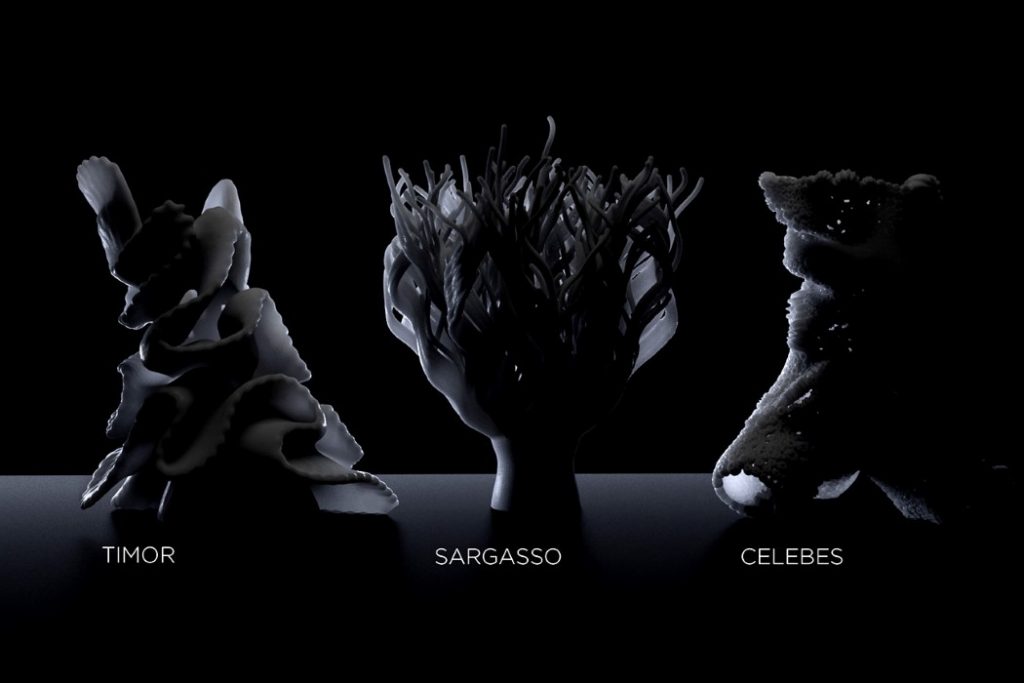
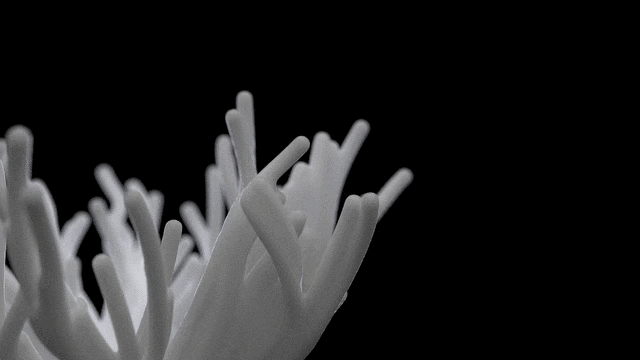
These lamp prototypes took their inspiration from different types of corals coming with varying aesthetics. Mauriello selected only three prototypes from hundreds of them to produce: the Timor, the Sargasso, and the Celebes.

Before 3D printing these Coral Lamps , Mauriello firstly developed the computational algorithms that mimic coral growth patterns,which show the “growth” of the lamps as they come into being. And, more remarkable,all three lamps were 3D printed in the USA, using processes which recycle waste material in an attempt to reduce waste and curb carbon emissions.
The Coral Lamp Lighting Collection is Mauriello’s way of paying tribute to the ocean’s beauty.As an senior surfer,Mauriello’ve experienced the beauty and power of the great ocean,in which coral is one of many magical living structures with all sorts of shape, scale and color.Mauriello’s lighting celebrates this thriving life created by an entire coral ecosystem.
]]>
Promotion for 3D printers,up to 35% off with $2.00 coupon,starting from $176. The max discount is as high as $100! Don't miss this sale!
Promotion for important 3D parts and other Geeetech products,up to 75% off with $2.00 coupon,starting from $1.01.
PLA filaments enjoy multiple discounts:
- Buy 2 get 10% off;
- Buy 3 get 15% off;
- Buy 5 get 20% off.
Up to 25% off with $2.00 coupon,starting from $1.99.
Further Reductions:
- $60 off over US $499;
- $37 off over US $166;
- $10 off over US $270;
- $8 off over every US $150.
They can be combined with other discounts.
Activity time: US time 11/11/2020-12/11/2020
Shop address:
https://geeetech.aliexpress.com/store/110623/pages/promotion-20201111.html
https://geeetechglobal.aliexpress.com/store/1415075/pages/promotion-20201111.html
Ebay:

- A30T Current Price:$469 ($100 off)
- A20T Current Price:$369 ($79 off)
- A10M Current Price:$229 ($30 off)
Lowest price on every 3d printer. And filament $/€11.11 limited auction began!So search “geeetech” on ebay now~
Activity time: 11/11/2020-12/11/2020 (various country times)
Shop address:
- DE:https://www.ebay.com/str/geeetechofficial
- IT: https://www.ebay.com/str/e4u2011
- UK: https://www.ebay.com/str/efind0813
- US: https://www.ebay.com/str/easybuy1413
Now we Geeetech official website is doing Double Eleven promotions,up to 25% off.There is a 20% discount on most of the A-series.You can buy the mainboard,filament, and hotend at a great discount here.Please refer to our official website for details.
Add the shopping cart now!
]]>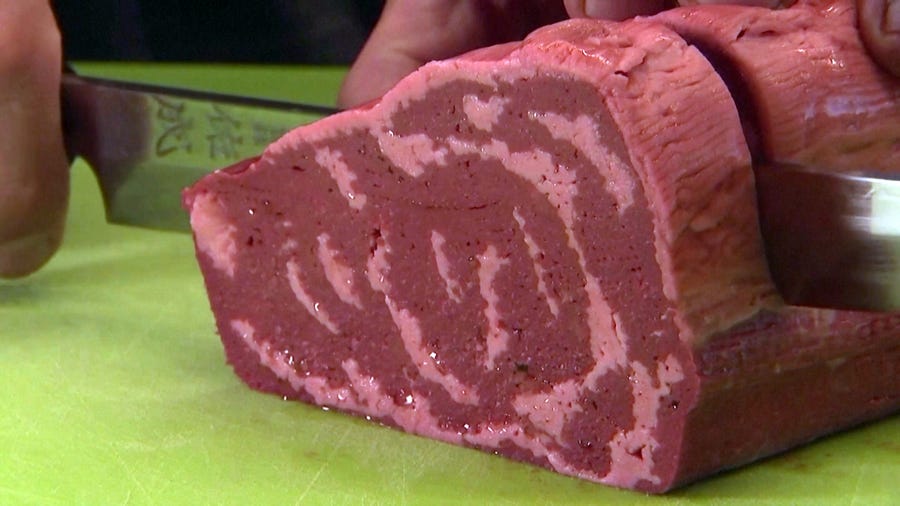
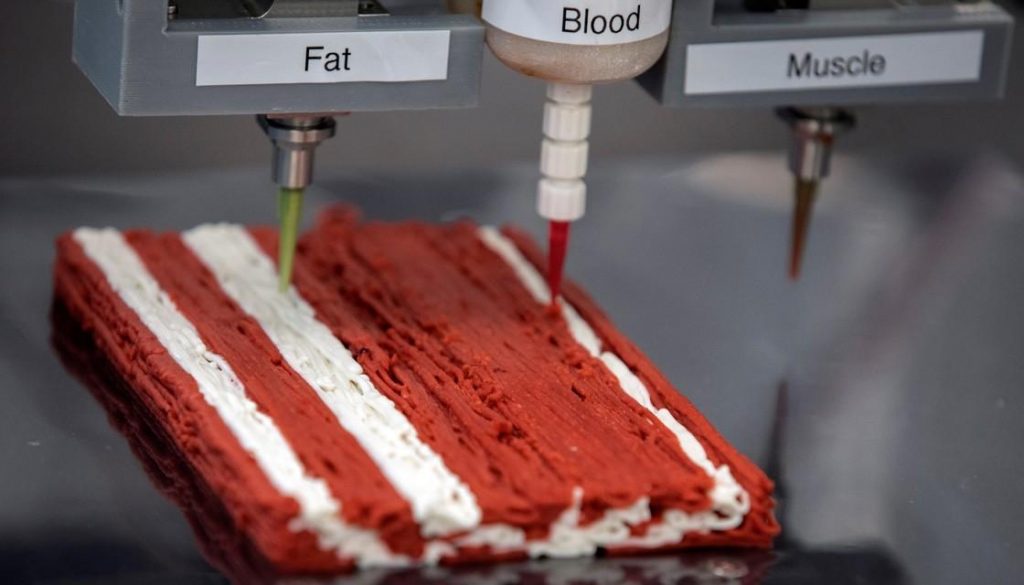
The start up Redefine Meat,founded in 2018,called on people to practice vegetarianism concept by 3D printing the steak instead of slaughtering animals for food.The company claims its steaks look,taste and feel just like real steaks,don’t require any real cattle to be involved in the production process,and are sourced entirely from natural,sustainable ingredients.What’s more,all the cooking methods,whether roast,slow cooking or grilling,can be applied to their artificial meat,which tastes even better than real meat.The good news is that it will be in high-end restaurants in Israel,Germany and Switzerland by the end of this year.
Redefine Meat uses:”proprietary 3D meat modelling,food formulations and food printing technology to deliver a new category of complex-matrix’meat’in a cost effective and scalable way”.The steak itself is made from a mix of soy and pea proteins,coconut fat and sunflower oil,plus natural flavors and colors everyone will love.
CEO Eshchar Ben-Shitrit specializes in manufacturing industrial-level 3D printers that will eventually be sold to meat distributors worldwide and become part of the meat supply chain.the CEO calls it”the best way to fight climate change,to deliver healthier solutions and food to the entire population of the planet.”It’s been reported that the coronavirus came from a sick bat,but it wouldn’t happen with the 3D printing meat,which is much cleaner.
The market for artificial meat has been very competitive in recent years,but Redefine Meat is focusing on expanding production by combining 3D printing technology with artificial meat production.
Are you bullish on this company?Will you try the 3D-printed vegan steak?Leave a comment below to tell me what you think.
]]>
Currently, more than 100,000 people in the United States are waiting for organ transplants.Kidney patients account for most of the demand, with more than 90,000 people seeking donor organs.Statistics show that 17 people die each day while waiting for new organs.At the same time, a new patient is added to the waiting list every ten minutes.So the American company United Therapeutics paid the Israeli company CollPlant 3 million dollars to speed up the production of the famous Bioink, called rhCollagen.This will provide ideal characteristics for bioprinting, including optimal rheology, greater safety, bio-compatibility and adjustable physical properties.It can also be compatible with a variety of technologies such as extrusion, inkjet or stereolithography.
Bio-printing is a particularly interesting technology for the medical sector, allowing the creation of human tissue and treatments that is suitable for each patient.Every day, methods are evolving and innovations are emerging, which means we’re sure to see functional organs being 3D printed within a few years.The good news for those waiting for transplants is that Bioprinting can design livers, pancreases, spleens and even kidneys.The companies CollPlant Biotechnologies and United Therapeutics Corporation have recognized that this technology could be the future of tailor-made medicine.
In October 2018, the two companies began a collaboration: United Therapeutics received an exclusive license for the CollPlant technology to produce and use bioinks based on human collagen for bioprinted lung transplants.Two years later, the partners began working on a kidney, an organ in need of a donor.CollPlant Bioink is made from human collagen.It requires very strict purification conditions, which makes it extremely long to process, but most importantly it is difficult to produce on a large scale.So the Israeli company relies on a plant platform to produce collagen.They explain: “The production of our recombinant human type I collagen (rhCollagen) starts in genetically modified tobacco plants. The recombinant human protein in the form of ‘procollagen’ is extracted from the leaves of mature plants and processed to produce a highly purified rhCollagen that can be used for the production of medical products.” This innovation will help develop bioprinting and regenerative medicine, provide an opportunity to create quality bioinks for the eventual design of different types of organs.
Thanks to the attention paid by the American United Therapeutics Corporation,the manufacture of kidneys is being addressed in hopes of reducing the number of patients waiting for transplants.
Reference:https://www.3dnatives.com/en/collplant-united-therapeutics-kidney-bioprinting-051020204/#!
]]>
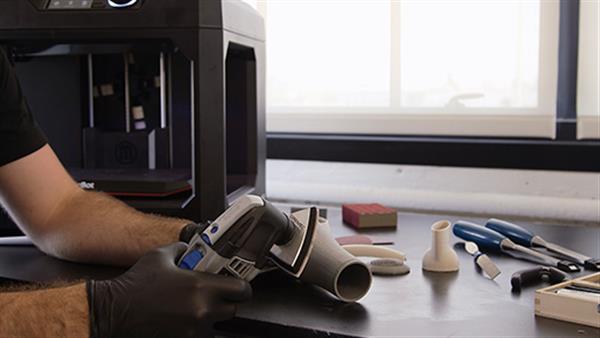
Whereas 3D printers using the same technology and marketed for about the same price usually do not vary much(theoretically) in terms of print quality, the results of post-processing can vary greatly depending on your expertise and skills. Simply put, you take either 100 percent blame or credit for your finished 3D prints.
So, what processes are involved in post-processing?
•Cleaning
In FDM, cleaning usually means to remove support structures from the object.
As we know, there are two types of support material: soluble and insoluble. Insoluble material is relatively strong and can only be removed with a spatula,knife or sheer brute force,leaving the model and print platform vulnerable from possible damage.
If you are lucky enough to own a dual extrusion setup, you may want to use soluble material for your supports. Soluble materials such as HIPS and PVA, can be dissolved in water or Limonene.
Check out our previous blog on how set up your 2 extruder 3D printer.
•Fixing
One way to circumvent supports is to have your model printed separately. This means you will have to manually attach together your parts. ABS prints can be welded or glued together using acetone. Here is a tip you should heed: when creating joints or keys for a model, make sure to create joining features large enough for the 3D printer to create them cleanly. Thumb of rule is that features should be larger than 4-5mm in diameter. Glued components should be secured together using rubber bands, and cyanoacrylate glue should be used to spot glue around the connecting areas. If seams are rough or have gaps, bondo or filler can be used to smoothen them.
•Surface finishing
Sanding
Layer lines are the bane of models printed using FDM technology. Carefully sanding the surface of the model with paper should get rid of the lines. This process requires delicate skills and great attention. Start with higher grit to lower as you go. Do not sand in one place for too long as friction-generated heat could melt the material. The downside to manual sanding is inconsistent results, as well as being laborious.
Smoothing
To give the print a glossy finish, chemicals are sometimes used. For example, Acetone and THF are used to smoothen the surfaces of objects printed with PLA and ABS. The problem with this technique is that it can not be controlled: sometimes features are melted off that should remain. On top of that, vapours can be harmful when inhaled.This can be avoided using closed chemical cleaning machines.
•Coloring
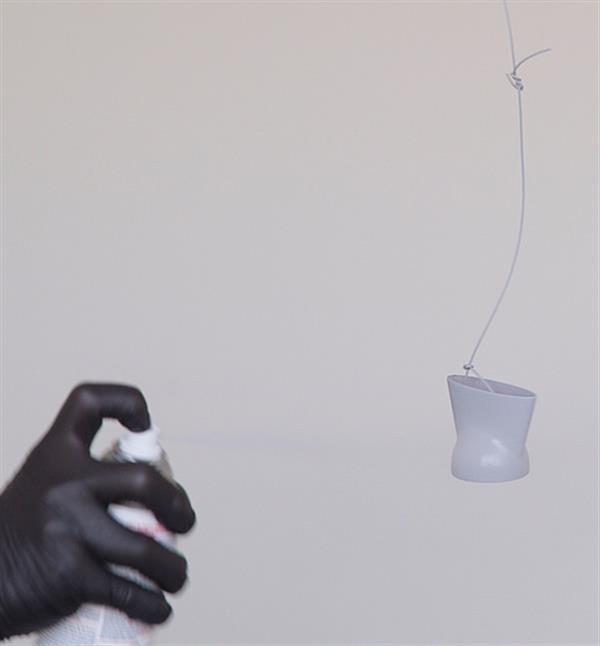
Coating and Painting
Surface finishing is often followed by painting. Parts need colouring would ideally be printed using white material. A layer of primer is usually applied before the model is painted,followed by another stage of sanding. Painting is usually done manually using a brush or spray(at an arms length). It is highly recommended that you hang the object in an open, dust-free,well ventilated space. This will allow you to paint all surfaces evenly without having to handle the model while paint is drying. The painted object should be ready to polish after 1-2 days.
Credit: beamler, 3der
]]>Before reading this article, please make sure you have already read the setup guide of the version of the 13B single extruder and that you are able to use it to print 3D models. If not, please learn how to operate the single extruder. Of course, you can take this one as the single extruder version to get started.
Step 1
Open Repetier Host, and click Config/Printer Settings to set up the connection.
1. Name your printer.
2. Select the corresponding COM port and baud rate. The baud rate is generally 115200 or 250000.
3. If you are not sure about the COM port, you can check it in your device manager.

Step 2
Set up your extruder
- Choose the number of extruders, here we choose
- Select the diameter and color of the filament
- Offset X/Y refers to the distance between the two extruders, which can be adjusted based on real situations. You can leave it alone now.

Step 3
Set up the shape of the printer
Choose Classic printer as the printer type.
Home X: min Home Y: min Home Z: min
Print height: 150

Now you can click the Connection button on the left corner to check whether it can connect with your printer. If it fails, please recheck the COM port and Baud rate.
Step 4
Manual control

1. X home
Click X home to home the X axis, or you can click the right/left arrow to move the axis to check whether the direction and distance are correct or not;
2. Check Y axis and Z axis respectively in the same way
3. Click the icon of the heated bed on RH to heat the bed. observe whether the temperature is rising to a pre-set value
4. Click the icon of the heated bed and extruder, observe whether it is heating up to the pre-set temperature, and keep it at that value
5. When the temperature for the extruder surpasses 170 °C , choose extruder1 and extruder2 respectively, you can move them and check their directions
Step 5
Leveling the two extruders.
Leveling the two extruders is very important if you want to print with two extruders at the same time.
First, you can adjust one extruder to make it parallel with the surface of the heated bed (the same way you level for a single extruder setup), click the button of Z home to adjust the distance between the nozzle and the heated bed, make sure the vertical distances of the nozzle to the four corners of the bed are the same.
After that, tweak the distance between the second extruder and the heated bed by adjusting the screws, as shown in the following picture: Loose the screws, and then you can move on to get the right distance between the two extruders and the heated bed.


you may need to repeat this step to get it all right.
But it’s worth it. Once you get it done correctly, you won’t need to do it again.
The settings mentioned above are on Repetier Host, which only involves the control of the 3D printer and the preview of the model.
All the settings do not concern the print result but the slicing. So we will continue with the slicing setting. The slicer is independent of Repetier Host. So, should we set up the slicer now? Take it easy. Let’s see whether our printer can run normally.
Step 6
If the printer goes well. We can go on with the slicing. First, let’s get a quick view of the slicer.
RepetierHost supports many slicers, with Slic3r and CuraEngine being the most popular; Slic3r is more powerful in terms of functionality, but CuraEngine comes with more optimized slice velocity.

You can choose a slicer here. Upon selecting the slicer, please click Configuration.RepetierHost will bring up a wizard of the corresponding slicer that will walk you through the configuration.
Here we take Slic3r as a demonstration. As to the configuration in CuraEngine, we will pick it up in the follow-up study in our forum www.geeetech.com/forum/, so, please stay tuned. If you are experienced in CuraEngine, we would appreciate it if you could.ld share your insights with us.
Next, download the file:two_color_cube.zip, unzip the file, and save it somewhere. You will need it later.
Step 7
Click Configuration, open Slic3r

Step 8
We have prepared a set of parameters for I3B_2E dual extruder, that is, I3B_2E_config_bundle.ini. You will need to import those parameters to slic3r from here.
In Slic3r, under file> Load Config Bundle.. navigate to the folder we just downloaded and unzipped, open I3B_2E_config_bundle.ini,


Step 9
After loading, you can find the option of Geeetech_I3B_2E in the drop-down menu.


In my case, I use the Geeetech pro-C model,(I refer to the I3B_2E in this article), the extruder is MK8(1.75cm-0.4mm), PLA filament, so we choose Geee_I3B_2E, PLA 1.75mm, and Geeetech_I3B_2E respectively.
All the parameters you set can be saved in RepetierHost for future reference.

Step 10
Unzip two_color_cube.zip, click Load to import the .stl files,choose two_color_cube_1.stl and two_color_cube_2.stl respectively.

Actually, two_color_cube is composed of two .stl files. each printed by one nozzle.
After loading, you can preview it. The two files are separated. Now you need to adjust the locations to combine them together.

Select Object Group 2 and click center, then Object Group 1 and center. Now the two models are combined as one.


Assign printing tasks for both extruders respectively.

Step 11: Slice

If this warning pops up, choose NO

G-code is generated successfully

Step 12: you can print directly via serial port (USB connector)or save the G-code to an SD card, and print stand-alone.
Step 13′: The end


This post was originally published on the Geeetech wiki page and is edited in this blog.
Please be noted this article was last modified on 11 August 2015, and hence is subject to changes, due to software updates and hardware upgrades over the years.
If you already have a dual extrusion system, we would like to hear from you. Share your story/experience with us by joining our forum or Facebook user club. You are also welcome to write on our blog to reach a larger audience.
]]>3D Printer Test Models
3D Benchy
The 3D Benchy model is probably the most popular and recognized print in the 3D printing community to compare and benchmark 3D printers. It is specifically designed to “challenge the capabilities and reveal the limitations of 3D printers”, according to the official site, it has been the most downloaded and printed 3D model. Indeed, its many features, such as the perfect symmetrical design and the large hull, will show any deviations from your machine.
The 3D model is printed at a 1:1 scale without any support materials. Now let’s compare it against its benchmark equivalent.
The Hull
Its hull–a large, smooth overhanging curved surface, shows any deviations. Our make shows no signs of sagging despite its relatively huge angle. Keep in mind this is printed without any support.
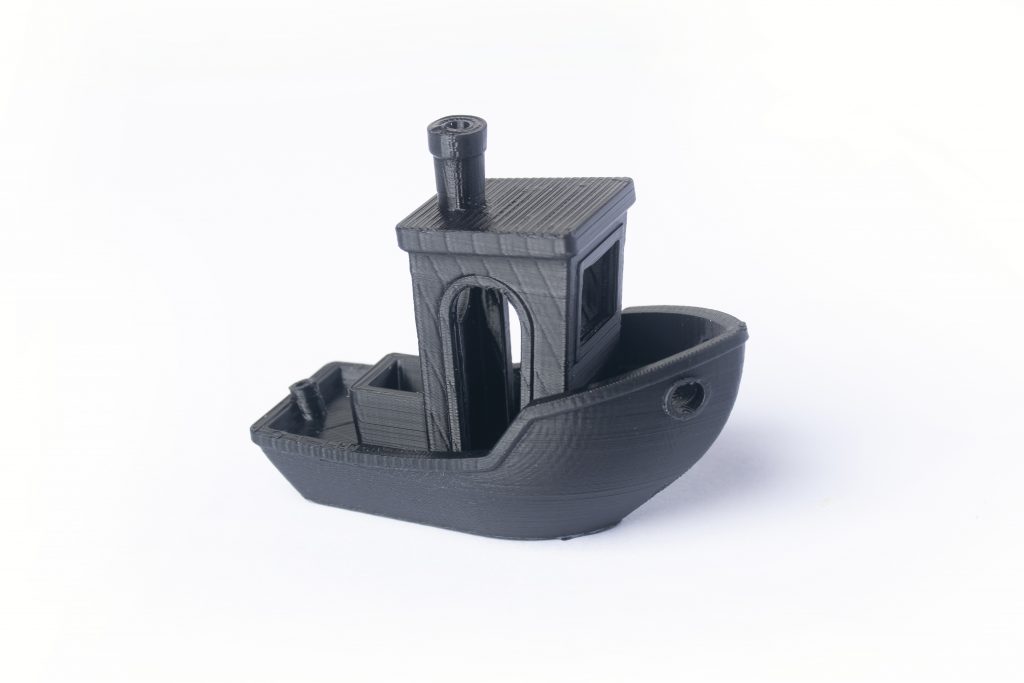
Symmetry
3D Benchy is symmetrical, which makes any skewness and warping easy to find.
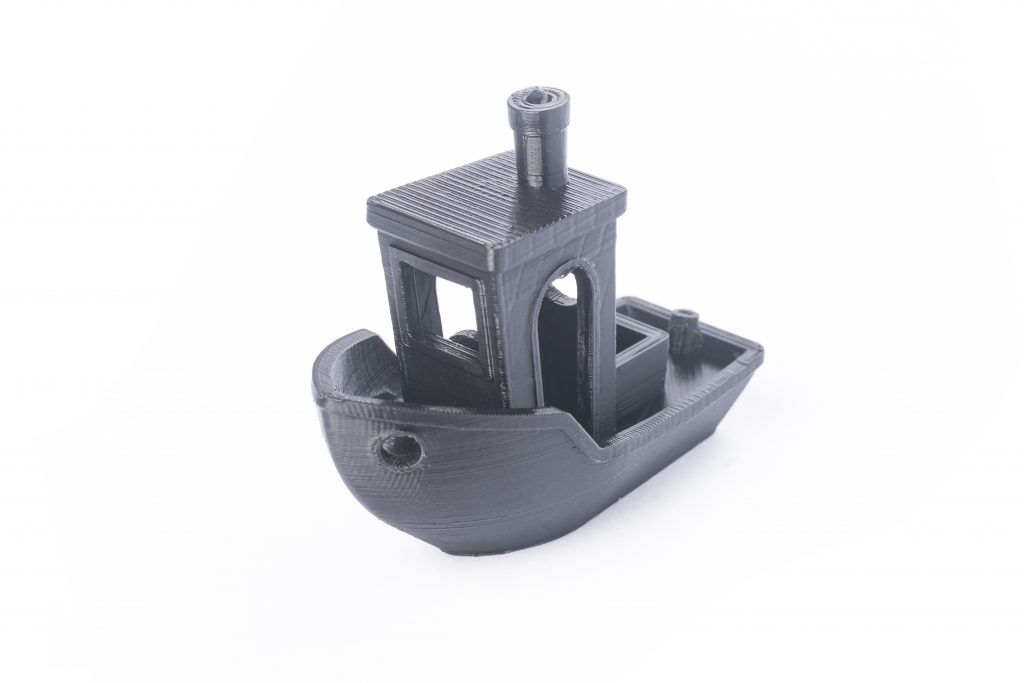
Overhang Surfaces
The inner side of the bridge reveals how well the 3D printer deals with overhang issues.
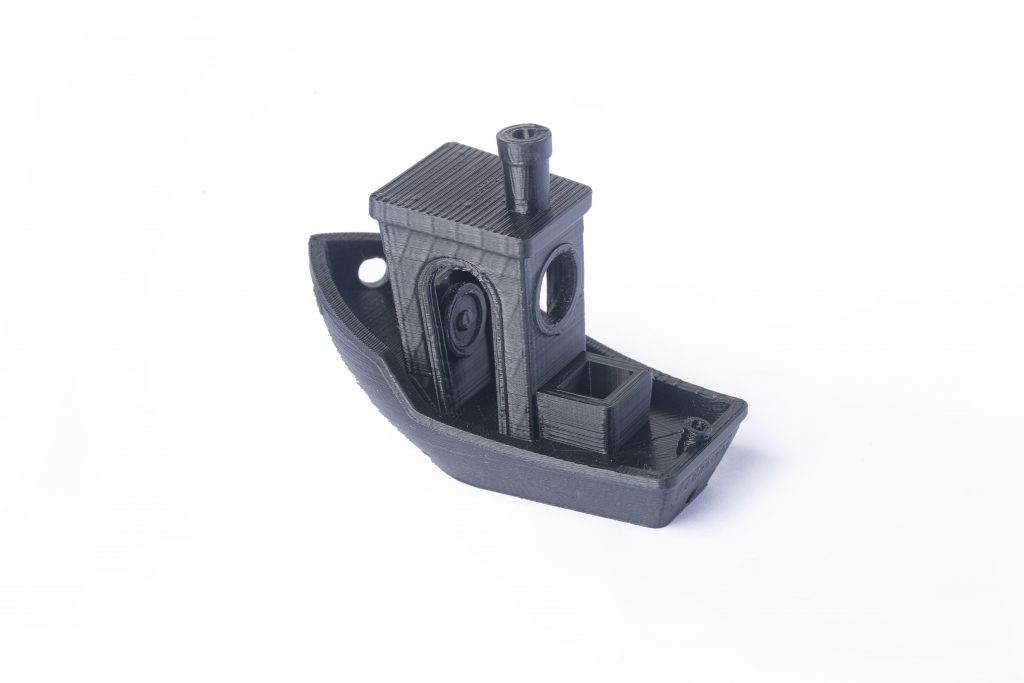
Settings:
Layer height: 0.1mm
Print temperature: 190℃
Print speed: 40%
Retraction distance: 6mm
Retraction speed: 30mm/s

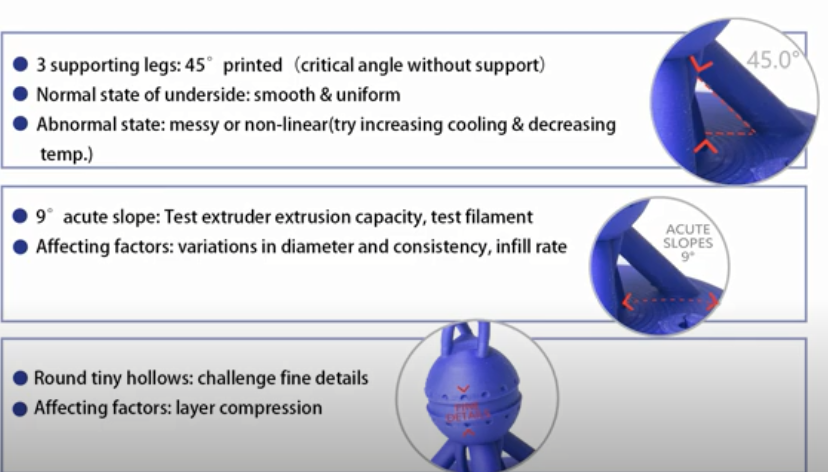
The PolyPearl Tower
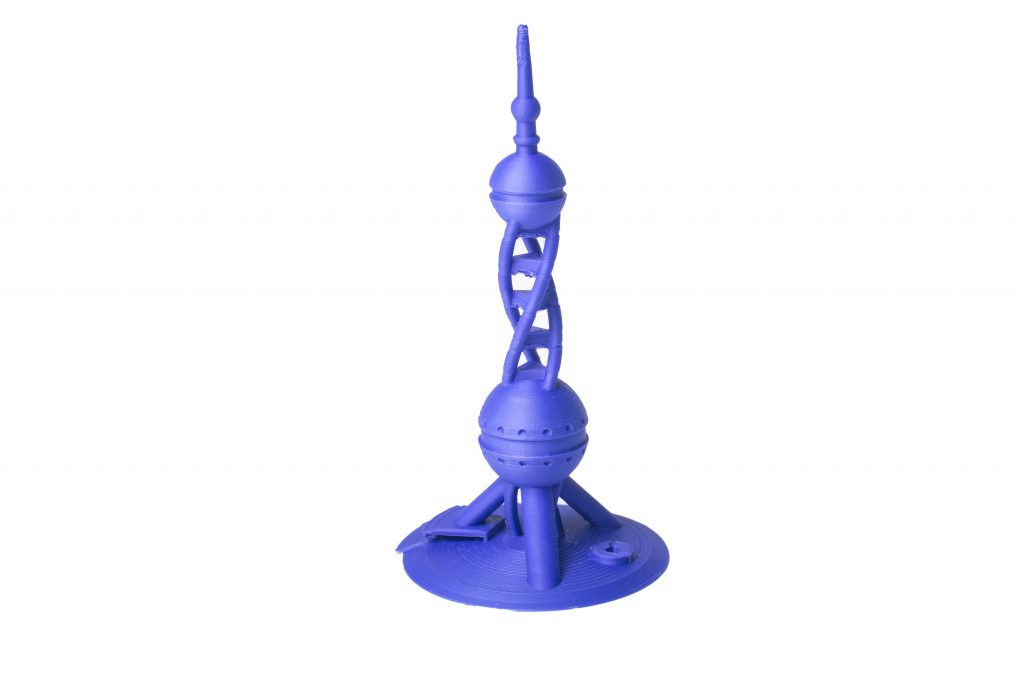
If the 3D Benchy model serves as an entry-level test, the Polypearl Tower Torture Model tests your 3D printer and filaments to its limits.
The main features of the PolyPearl Tower are as follows:-
45° Overhangs
Usually, 45° is referred to as the critical angle that printers can handle without using support material on a given model. The three supporting legs of the PolyPearl Tower are all printed at 45°. Check the underside of these pillars after printing, they should be smooth and uniform, if you find the pillars are messy and non-linear, try increasing cooling and decreasing temperature.
Acute Slopes
Featuring an acute slope of 9° this feature will test your printer’s ability to extrude uniformly. This is also a good test of the filament, as variations in diameter and consistency will result in gaps or non-circular rings. Tweak your extrusion multiplier to perfect the acute slope, this feature can also be affected by your infill percentage. A low infill percentage will not provide the necessary support for the rings to form neatly. Still, having trouble with acute slopes? Try increasing the number of top solid layers on your print.
Fine Details
Fine details are a challenge for any printer. The lower ball of the PolyPearl Tower features tiny circular indents around the center. Check the form and roundness of these holes, they should be round on both sides of the center band. You can compare the top indents against the bottom to see if the layer compression has affected their roundness. On all our test models we never found a perfect set.
The tiny pillars on the front of the pavilion are one of the most challenging aspects of this model. Being very thin, angled, and able to support the bridge of the pavilion roof is surely a tough test for any 3D printer. This is a good place to test your retraction settings, aim for clean pillars with no strings in between. The bridge on top should be well formed and also curved. This aspect of the print is almost impossible to perfect so good luck trying!
Overhangs
On both of the ball sections of the PolyPearl tower, you will find a small overhang section. Inspect the form of these details and compare the top against the bottom. The bottom should be well-formed, circular, and flat. The top overhang is much trickier to perfect, check the sharpness compared to the bottom. This feature is affected by the number of shells/perimeters you choose and how you choose to print them. We suggest inside-out to get the best edge on the overhang. The underside of the balls themselves ranges from 90° to 0°, the top ball, in particular, has less support so keep an eye out for the roundness near the base of the top ball.
Extrusion
To achieve the perfect extrusion settings there should be no indication of where the layer has started and stopped. In this picture, we have used PolyWood to demonstrate a perfect extrusion. Play with your extrusion and retraction settings to achieve the perfect extrusion. Using a matte finish material like PolyWood helps blend the layers also!
Roundness
Check the roundness of the balls on the PolyPearl Tower model. These balls should be consistent and spherical. Play with your speed settings to optimize roundness, most PLAs will print happily at 60mm/s.
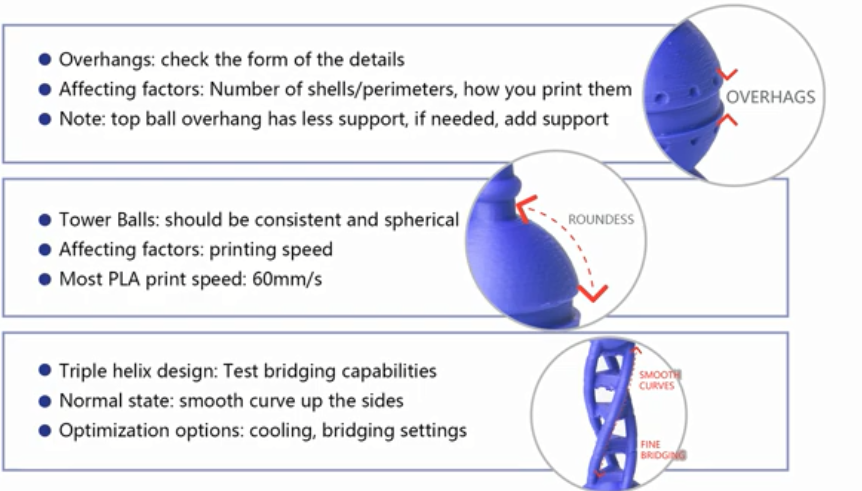
Fine Bridging and Smooth Curves
While the distance of this bridge is not that impressive, the triple helix design of the PolyPearl Tower will test your printer’s bridging capabilities on 4 different orientations in one print. We found this change in orientation resulted in some messy bridging on one or two of the sections. Play with your cooling and bridging settings to optimize the fine bridging. You should also notice a smooth curve up the sides of the triple helix. Key an eye out for layer shifts where the bridges meet the helix.
Top Layer Fill
The Top Layer Fill on the Polymaker Logo should be completely filled in. This is affected by the number of Top Solid Layers you choose and also by the amount of shells/perimeters you choose. Too many shells/perimeters and you will be left with a gap in the top surface.
Reference:https://polymaker.com/polypearl-tower-torture-test-model/
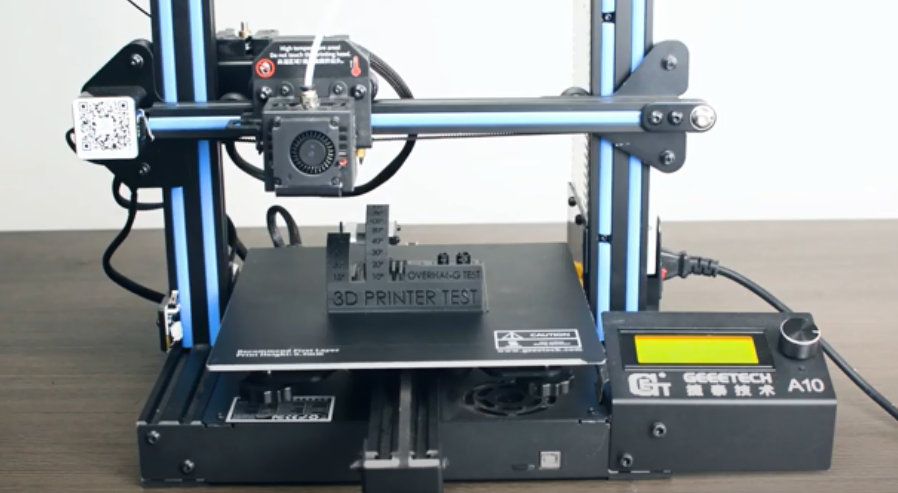
All-in-One 3D printer test
This test includes a support test, scale test, overhang test, hole test, diameter test, and bridging test. It is printed with 100% Infill without supports.
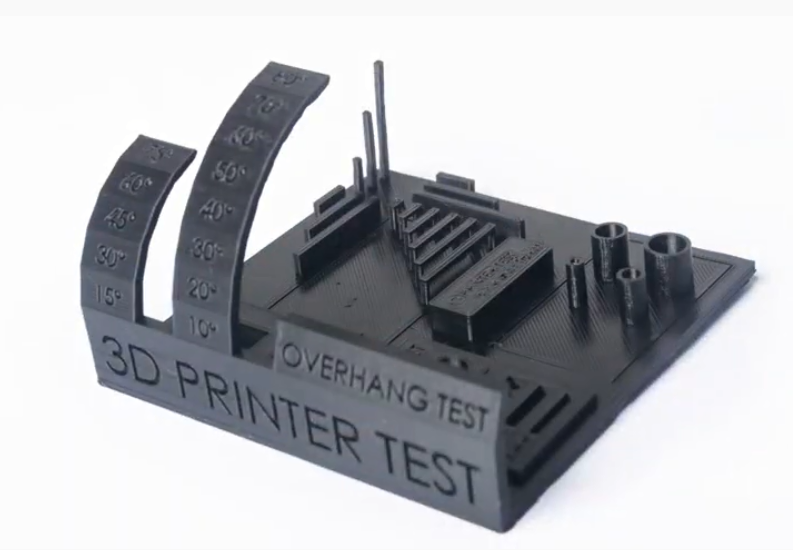
45 degrees is said to be the critical angle for overhangs without any support, but here we have an 80-degree overhang with no support. The overhang and bridges are printed with no signs of sagging or drooping.
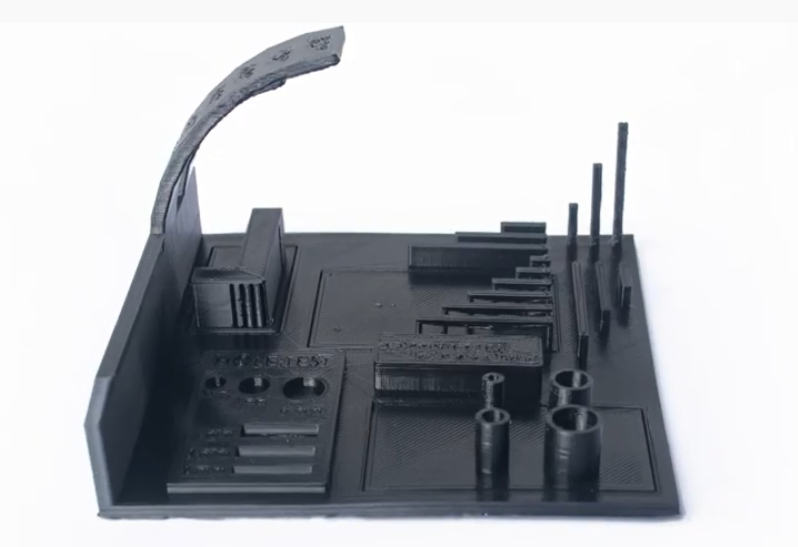
The clear and sharp corners show no signs of stringing or deviations.
If you also would like to perform the tests on your 3D printer, you can download the test 3D model on the internet or feel free to contact us for the files. Don’t forget to share with us the results in our Facebook User Group
By the way, the new A10 3D printer comes with an upgraded motherboard/LCD/Frame, and is now available for $219, 8% off its original price!
]]>
Assembly & Set Up
Set up your 3D printer as per the instructions. No matter how experienced you are, your vendor supposedly knows the products better than you do. It is recommended that you use parts, software, and materials from the same brand wherever you can to get the best experience. Remember, every 3D printer has its characteristics. Be open to some trial and error down the road.
Software Update
Keep your system up to date. Manufacturers and slicer companies are constantly experimenting with their software and firmware to fix bugs and improve performance. If your machine features an automatic update, enable it.
Maintenance
Perform regular maintenance and calibration on your 3D printer: Form and maintain a routine of checks; keep your filaments from moisture and dust; calibrate the bed.
Supports
Bear in mind the 45-degree rule and 5mm rule. Any overhangs of above 45 degrees(or 60 degrees depending on your printer) may require supports. Just like overhangs, not all bridges require support. Consider supports only when the bridge is more than 5mm long. “Rafts”, and “brims” are great support tools to increase adhesion. Add support structures to your design for any steep overhanging features or models that have a small base.
While supports are great for some cases, you may want to avoid them, for the following reasons: first, they consume extra filament; second, the print takes longer time; and finally, removing the support structure of the print can be a pain. If you are still not sure whether you need support, run a test print to find out. You can also use your creativity to make the support structures part of your design, in case you think them necessary. Ways to circumvent supports: reorient your model; reduce the overhang angles; and split your model into smaller parts.
The first layer
Your first layer is the foremost important layer of your print. Make sure it sticks well to the bed. Again, support structures, a heated bed, and glue all are great tools to help with adhesion.
Details
Examine the details of your model. Are there any tiny projections or parts that are too small to print on a desktop 3D printer? In your printer, there is a very important but often overlooked variable, that is the line width, which is determined by the diameter of the printer nozzle. Most printers come with a nozzle of 0.4 mm or 0.5 mm in diameter.
]]>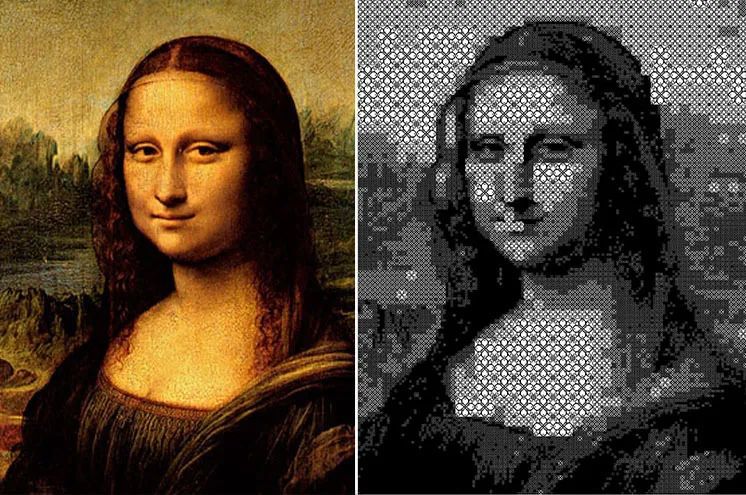
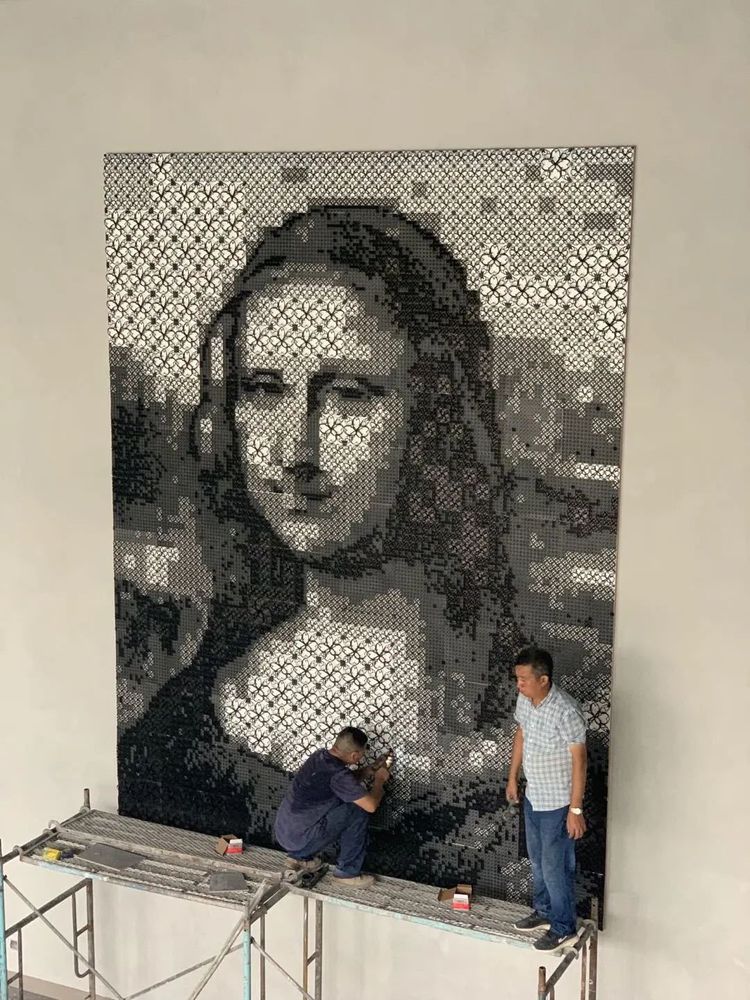
In the creation of the massive Mona Lisa, staff at the museum turned the image into pixels which they later printed out and assembled. In order to do that, they used fractal artificial intelligence (AI) to optimize the image through automation, aided by computer modeling to create file formats that are compatible with 3D printing to produce the pixels in batches. The combination of AI and 3D printing technology represented the ideal solution to customization and helped decompose the original painting into the desired elements.
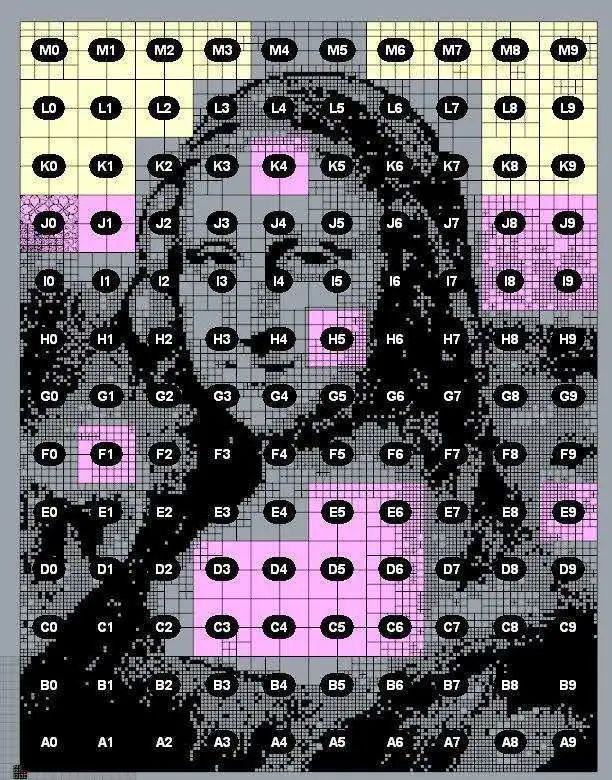
In this case, the original picture was divided into 130 pieces which, in turn, were further divided into five smaller units. Each one of the 130 pixels that make up the entire work was additively manufactured in nylon using selective laser sintering (SLS) technology. Furthermore, to help the team produce and put up the artwork correctly, each piece had a number printed in the upper left corner.
The inspiration of 3D printed digital pixel pictures originates from the pixel art movement in the 1970s. At first, this form of artistic expression was used in computer game design.The granular art style has since been used in many works of art, such as LEGO versions of classic and iconic pop art,and many artists have incorporated 3D printing technology to produce more personalized visual effects.
Recreations of famous artwork are not new.But with 3D printing technology, experts have been able to offer art lovers, students, and tourists new ways to appreciate centuries-old works, even helping towards good causes, like offering the visually impaired unique opportunities to experience masterworks by creating three-dimensional blueprints of two-dimensional images.
Built upon the former site of Shanghai’s No. 3 wool textile mill in the north Baoshan District in 2017, the museum has been transformed into the city’s first scientific and cultural complex featuring 3D printing technologies. Housing over a dozen artists’ workshops along with over 300 global companies engaged in 3D printing, intelligent micro-manufacturing, virtual reality, augmented reality, and artificial intelligence robotics, the site is much more than a place for tourists and visitors to explore. By purchasing 3D printing machines and other technology, the park has become a go-to site for startup companies to print out their designs. The museum doors are also usually open to companies that wish to introduce new technologies to clients. Asides from the exhibition hall, the museum is complete with a 3D printing research and scientific center, creative gallery, 3D sky garden, coffee shop, and 3D children’s activity center.
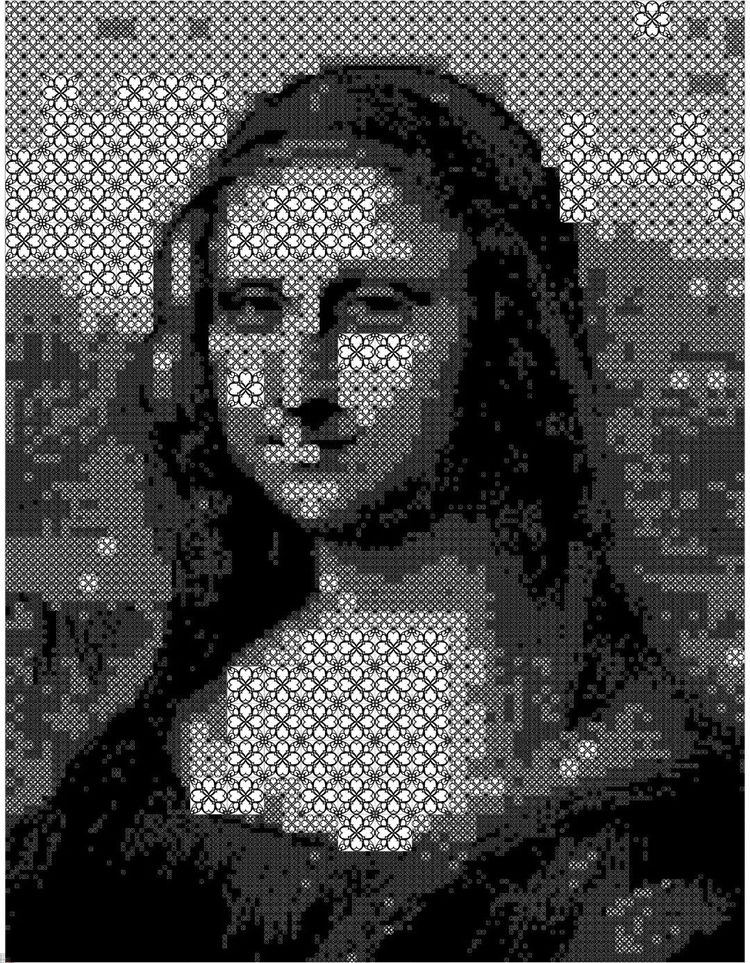
By showcasing the pixelated Mona Lisa, the museum is exploring ways to leverage 3D printing technology to enhance the art industry, moving away from conventional viewing experiences and introducing a different take on a universally recognized work. Museum experts tried to imitate in black and white Da Vinci’s s design and the imperceptible transitions between light and shade that leads to the unique coloring and optical illusions that continues to draw so much attention to the enigmatic smile of the subject in the painting. The pixelated accomplishment will make for a different and memorable experience to the visitors of the museum and a step forward for the Chinese 3D printing community as it continues to explore the capabilities of the technology.
Source: rtmworld.com; 3dprint.com;
Photo credit: 3dprint.com
]]>3D printing stringing can be a common problem especially if you are a newbie or when dealing with a new machine or material. But luckily, it is a problem that is fairly easy to solve. Let’s look at some causes and the corresponding solutions:
Retraction distance
Retraction distance is the most important retraction setting as it determines how much consumables is pulled back from the 3D printer nozzle. Generally speaking, the further your nozzle retracts, the less likely oozing is to happen. But if the distance is set too high, the plastic may not be able to to reach the hot end and may cause under extrusion. In general, Bowden extruders require a higher retraction distance than direct drive extruders.The optimal value falls in somewhere between 4-7mm(most likely to be 6mm) for most Bowden extruders and 0.5-2.0mm for most direct drive extruders. Some trial and error is probably going to be required to get the retraction distance right.
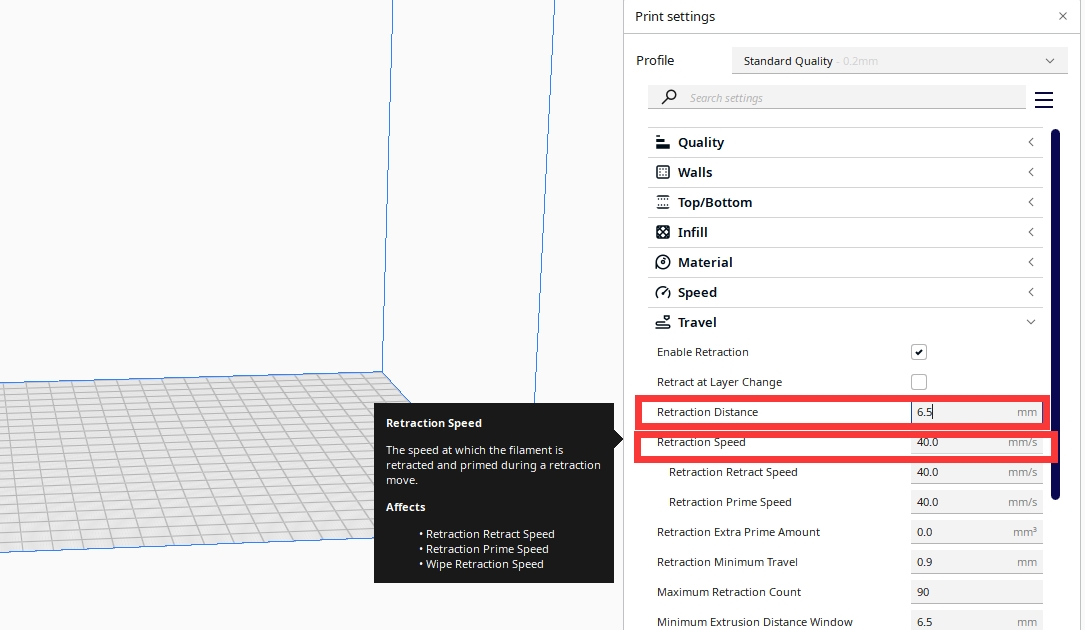
Retraction speed.
Retraction speed determines how fast the material is retracted from the nozzle. Generally, a quicker retraction will reduce the chances of leaking. But again, it could also be problematic: first, it may cause the plastic to separate from the melted filament inside the nozzle; second, the fast movement of the drive gear could grind parts of your filament away. A sweet spot is usually found somewhere between 25-40mm/s. Again, you will need to experiment to get the optimal value.
Temperature
If stringing persists after you have tweaked around the retraction settings, go on to check the extruder temperature. As the temperature goes up, the plastic inside the nozzle becomes more liquefied and less viscous, and therefore, more likely to drip out of the nozzle. On the other hand, if the temperature is too low, the filament may not be properly heated and melted,creating problems with extrusion. To fix excessive stringing and avoid issues with extrusion, start out by lowering the temperature by 5-10 degrees to see if the print quality improves.
Temperature setting for filaments:
- PLA 185°C – 215°C, hot bed 25°C – 60°C
- Silk PLA 200-230°C, hot bed 40-60°C
- ABS 230-240°C, hot bed 100-110°C
- PETG 220-240°C, hot bed 80-90°C
- TPU 200-230℃, hot bed 50-60℃
Travel distance and speed
Another possible solution to stringing is to reduce the distance between points/locations the extruder travels. As we already know, stringing occurs while the extruder is moving to the next point. Therefore, the reduced travel distance will slash the chances of leaking. By the same token, increasing the movement speed of the extruder can also prevent stringing from happening.
Maintenance
To avoid stringing, you are also suggested to do the following :
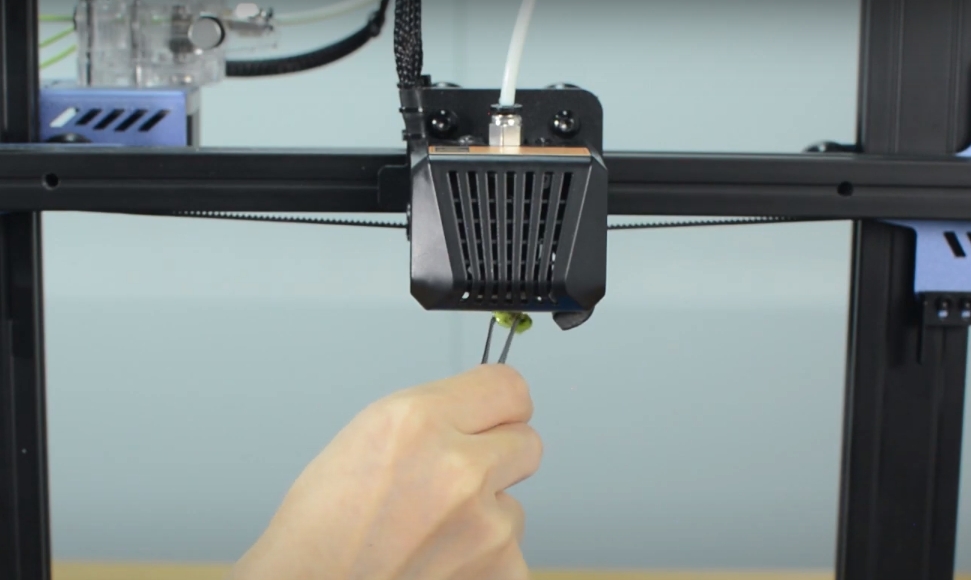
1. clean your nozzle. Necessary tools for cleaning nozzle: tweezers, wrench, cleaner rod, needle and allen key. Firstly you need to preheat nozzle and use tweezers to remove extra filament from nozzle. Then you need to unload the filament and pull out the PTFE tube from hotend. Next, use a cleaner rod to push in and out nozzle for several times to clean it thoroughly with proper strength.
2. keep your filament clean and dry. We recommend you to use vacuum bag or dryer box to stock your filaments. If you keep it expose to some extent humid air and dust for a long time then it will certainly affect heating process and more likely to break during printing process.
Reminder: performing a routine maintenance on your 3D printer always helps with your print quality.
]]>