Me Creator
Contents
Introduction

Me Creator is the fifth generation printer designed by Geeetech.Me creator is designed to help more makers and the general public to get easy access to this emerging 3D printing technology. Although the price of Me Creator is much more affordable than other printers on the present market, the quality is never the sacrifice of the price. We apply world-class manufacturing and engineering principles to the 3D printer. Built on steel-frame design, Me Creator stands for reliability and stoutness. Moreover, Me Creator is compatible with most OS such as Windows, Mac and Linux, which allows Me Creator to be easy-to-use,with multiple functions, all you need is just a computer and a power supply to enjoy the pure fun of making.
Features
- Low profile and nice exterior
- High Cost-Effective
- Creates plastic parts up to 150 x 150 x 150mm
- 300 x 290 x 300mm case footprint (L x W x H)
- Uses 1.75mm plastic filament (ABS/PLA)
- Heated Aluminum Build Platform with heated Bed
- Resolution up to .1mm
- Thumbwheel calibration of platform height - no wrench required
- Operating voltage: Input 110-240V, Output 12V
Technical Specifications
Physical Dimensions
Case Footprint: 300 x 290 x 300mm
Printing Specifications
Printing Technology:Fused Filament Fabrication,FFF
Layer Resolution:0.1mm
Build Volume:150 x 150 x 150mm
Filament Type:ABS, PLA
Filament Diameter:1.75mm
Nozzle Diameter:0.3mm
Temperature
Max Heated Bed Temp:0-110 ℃
Max Extruder Temp:0-250 ℃
Electrical
AC Input:110V—240V, 3A, 50-60HZ
Power Requirement:120W
Connectivity:USB
Mechanical
Chassis:Steel Frame
Build Platform:Aluminum
Safety Instructions
We recommend the following practice instructions for the safe and effective use of our printers. Failure to follow these practice instructions may (i) degrade your printer’s performance, (ii) cause injury and/or damage, and (iii) disqualify you from customer support. Please ensure that you have read and understand all practice instructions before using your Me Creator printer for the first time. You can contact the Me Creator Customer Support Team with any questions about the practice instructions at our [forum].
Operation
- Never reach inside your Me Creator printer when it is turned on. Moving parts can cut or pinch you, and several parts reach high temperatures that can cause burns and other injuries.
- Always allow your Me Creator printer to cool down for at least 5 minutes before you touch any internal part or remove a printed object.
- Never leave your Me Creator printer unattended while printing or powered on.
- Always turn off your Me Creator printer and disconnect it from your computer when not in use.
- Never attempt to print using any materials that have not been approved by Me Creator.
- Keep the nozzle tip at least two inches away from the heated build platform anytime you are not running a print job.
- Never operate your Me Creator printer if it appears damaged.
- In case of an emergency or malfunction, immediately disconnect your Me Creator printer from the power outlet and computer.
Placement
- Always operate your Me Creator printer in an open, well-ventilated area to allow potentially irritating fumes to dissipate.
- Never operate your Me Creator printer outdoors, near open windows, or anywhere where it may be exposed to water or moisture.
- Always place your Me Creator printer on a flat and sturdy surface to avoid power interruptions and deformities in your prints.
- Never place objects on or above your Me Creator printer or power supply.
- Always have a working fire and smoke alarm in the same room as your Me Creator printer.
- Never place your Me Creator printer near open flames, heat sources, or flammable materials.
Connectivity
To avoid printing interruptions, disable your screensaver, sleep, and hibernate functions on your computer.
- Make sure the heating plate and extruder are not heated when starting software.
Power
- Plug your computer and Me Creator printer into the same power outlet for best performance.
- We recommend plugging your Me Creator printer into a surge protector with a circuit breaker.
Never attempt to open or fix your power supply. If you believe your power supply is not working properly, contact us asap.
- Only use the power supply that was provided with your Me Creator printer.
- Do not plug your Me Creator printer into the same outlet as power hungry devices such as air conditioners, space heaters, or other large appliances.
Modifications
Me Creator printers are tested for performance and safety before they leave the factory. Me Creator cannot guarantee the performance or safety of printers that have been modified by users.
![]() Warnings
Warnings
- THERE IS A RISK OF ELECTRICAL SHOCK. UNIT IS NOT USER SERVICEABLE.
- ME CREATOR PRINTERS CONTAIN HEATED MOVING PARTS. NEVER REACH INSIDE THE PRINTER WHILE IT IS IN OPERATION OR BEFORE IT HAS COOLED DOWN.
- NEVER LEAVE YOUR ME CREATOR PRINTER UNATTENDED WHILE POWERED ON OR PRINTING.
- DISCONNECT YOUR ME CREATOR PRINTER FROM THE POWER SUPPLY AND COMPUTER WHEN NOT IN USE.
- DO NOT ATTEMPT TO PRINT MATERIALS NOT APPROVED BY ME CREATOR.
- ONLY OPERATE YOUR ME CREATOR PRINTER IN A WELL-VENTILATED SPACE AWAY FROM MOISTURE AND HEAT SOURCES WITH A WORKING SMOKE/FIRE ALARM.
connect power supply
1.Take out the powersupply unit, check the condition of it and check it is 220V or 110V, you can switch it according to your real situation. this is very inportant.
2. Loose the screws on the connector,then screw the wires up in order, you can refer to the color of the wire, as shown in the following picture.

L -- brown
N -- blue
GND -- yellow
COM -- black
+ V -- red

Install the drivers and software
Install the drivers
Installing Drivers Before printing, you’ll need to install drivers. The kind of driver that a Me Creator requires in order to operate properly is called a USB Serial Driver. A USB Serial Driver is software that establishes a COM port.
Plug the USB into a USB port on your computer. Windows Update should automatically find and install the drivers. You’re done with installing the drivers!
Windows 8
When you attempt to install the unsigned 3rd party driver on Windows 8, you will most likely not be able to install because the file is not digitally signed. To get around this restriction, you must temporarily remove this restriction by following the instructions here .
Once you have followed the directions to disable driver signature enforcement, download the driver and click to install. This is only a temporary change, however, and restarting your computer after you have installed the driver will return your computer to its normal state.
Note that this involves restarting your computer, so make sure to close out all other windows. You may want to print out these instructions so you can refer to them while your computer is restarting.
Windows Manual Install
Note: In some cases the drivers will not install on their own. The drivers for Windows can be found here
If the driver was not automatically installed, you may see this screen:

In this case, a. Click “Change Settings…” b. Select “Install driver software from Windows Update”. c. Click “Save Changes”. The FTDI drivers should now install successfully.

Attention: For those having difficulty selecting your COM port
If you have installed the USB serial driver successfully and you are still not able to connenct to your printer in Repetier Host, then windows has not recognized the newly installed driver. In Repetier Host, you may even notice an error message that is similar to this one:
Serial com error:System.IO.Ports.SerialErrorReceivedEventArgs
In some situations, a computer running windows will not automatically recognize a newly installed Serial driver. This means that you will have to update your newly installed driver manually.
To manually update the driver, you will first need to plug the USB cable into your printer and attache the other end directly to one of your computer’s USB ports. Now, enter the ‘Device Manager’ in Windows and navigate to the hardware category called Ports (COM & LPT) and then left click on it once. You should notice the Ports category expand to reveal a Sub-Category called USB Serial (Communication Class, Abstract Control Model) (COM X); where X is the COM port number. You should be looking for that COM port number in Repetier Host after this procedure is completed; which can be found in “Printer Settings.”

You will need to right click on the USB Serial Sub-class and select proprties. In the drivers tab you will find a selection to update drivers, click on Update Drivers to access the next menu.
Now that you have selected which driver to update, you will have to tell Windows where the “updated” driver can be found. You should be presented with two options. Select “Browse my computer for driver software” to locate and install the driver software manually.

Next, you will be greeted by a menu that allows you to “Browse for driver software on your computer” You will be presented with two choices, select “Let me pick from a list of device drivers on my computer.” Now select the Serial port device and proceed with the installation.

That is pretty much all there is to it. You will then see an installation indicator bar.

Once the installation is complete you will be notified that “Windows has successfully updated your driver software.” You will be prompted to restart your computer; you should do so.

Macbook
Download link of driver: http://www.ftdichip.com/Drivers/VCP.htm
Download the driver that is compatible with system version.
Open the downloaded file, you will see a .pkg file, Open "FTDIUSBSerial.pkg"

Click "Continue" in Instruction.

Click "Continue" in Read me.

Click "Continue" in License.

Click "Agree" to continue installation.

Select the installing destination and click "Continue".

Click "Install" in Installatin Type.

Mac will start to install the driver:


Once your computer restarts, try selecting the appropriate COM port and baud rate in Repetier Host and then connect.
Install Software
we will take windows OS as an example.
To install all required software by Me Creator, please follow the steps provided below.
1) Download and install: RepetierGEtechSetup.exe
step 1,start the installer,choose the display language. step 2,click next to continue

step3,select the destination where you would like to install the RepetierGEtechSetup.

step4,select start menu folder and create a shortcut, click next to continue.

step 5,get ready to install. Click install.

step 6,wait about half a minute while installing. The green bar will show you the rate.

step 7,set up has finished the installing, you can choose to launch it immediately or exit out.

2) Plug the power cord into a wall outlet and the USB cable into a USB port on your computer. Windows should detect your motherboard and assign the appropriate driver.
3) Open Repetier Host and Connect to your Me Creator!
Click on the Manual Controls Tab and click in a direction X or Y to test your connection. If you are having difficulty connecting, please review the following supportive documentation: Installing Drivers and How to connect.
Please note that if you have difficulty connecting, there might have been an issue with the installation process. Ensure that the following have been installed:
Download and install the Serial Driver.
Download and install Microsoft .netFrameWork 3.5
In Mac, you can download Repetier for Mac" at:
After downloading, open "Repetier-Host-Mac_56.dmg",then you will see the icon of "Repetier Host", open it.

How To Connect
1. Plug the USB port into your Me Creator and the other end into your computer.
Do not be alarmed if the standard messages do not appear. Because of the Me Creator’s drivers, it may show up as a generic USB device.
2. Power on the Me Creator. You can see the LED lights and fan come to life! You may be able to hear the motors idling.
3. Open Repetier Host and ensure that you have a valid port selected for communications. To do this simply click “Printer Settings” in the upper right-hand corner to bring up the printer settings menu.

4,Select GEEEtech MeCreator in “Printer”

5,Select the corresponding COM port, click OK to continue.

6. Click "Connect" in the upper left-hand corner, select GEEEtech MeCreator. You should see the details of the connection in the console window in the bottom section of the screen.
.png)
In Mac, you should finish step 5&6 in "Printer>Printer settings", step 4 is unnecessary

7. In the right panel, click the "Manual Control" tab.

8. Scroll down and click both heat extruder and heat printbed buttons to activate your heaters. You will know they are on if they turn a bright blue.
The heat will gradually rise, as you will see from the status bar on the bottom of the window. The extruder should be set to 195° and the bed should be set to 95°.

7. Once full heat has been achieved do a few quick tests. Click the -X/+X arrows to ensure that movement is possible. Click the extrude button, with the down arrow, in the Extruder section to ensure extrusion is possible.


slic3r setting test
1. Open your Repetier Host and click slicer and configure

2. you can see the slicer confirure pannel now.

3.Now you can load the ini file into the slicer or configure the parameters one by one, firt let's see how to load the file.
step 1. click file> load Config

4. Find the ini file in your computer. and you can see the parameters changed accordingly.

5. You can download the configure file here.Media:MeCreator.rar
Leveling The Print Bed

Getting the bed level in relation to the X and Y axis is very important for getting prints to stick well and is one of the first steps you should do when receiving your Me Creator. The first layer might have the right amount of squish in one area, but if another part of the bed is too low, that part of the print is more likely to come unstuck and begin to warp. The level is adjusted with the spring loaded screws, two at the front and one at the back. If you are using the standard kapton tape on the build platform and not a sheet of glass, you will need to poke holes in the tape in order to turn the leveling screws or print some thumbscrews and use a little super glue to screw them onto the bottom of the leveling screws. We suggest using the thumbscrew route so that you do not have to damage your kapton tape.
Leveling the bed with a piece of paper
You can check the level of the heated platform by using a piece of paper to check the gap under the nozzle. It’s best to do this with the platform heated to account for any change due to expansion.
Put the paper under the nozzle near one of the front screws and raise the bed .1mm at a time using the manual controls in the software interface while sliding the paper back and forth. Stop when you feel the nozzle start to grab a little bit.
Move the nozzle to the other front screw and adjust the screw until you get the same amount of friction as you felt with the first one. Then adjust the back screw the same way. Once you have adjusted each of the three screws, go back and check each one again, since adjusting one screw can affect another. You shouldn’t need to go around the bed more than twice.
Leveling the bed with a dial indicator
The best way to level the bed is with a dial indicator. This uses a spring loaded plunger to detect changes in distance. You can mount one the the front of the extruder, and zero the reading at one corner of the bed. The watch for the readout to change as you move it around the bed and adjust the screws accordingly. If the fit is too loose for the tab on your gauge, you can use a few pieces of tape to thicken it up.
Belt Tensioning


There are 3 belts to be adjusted on your Me Creator. These steps will guide you through adjusted them.
Tools:
2.5 mm hex driver
1.5 mm hex driver
Steps
1.As always, before trying to work on any part of your Me Creator, make sure that both the bed and extruder are turned off to prevent burns. Lowering the bed will also keep it out of the way so that you can access all the necessary parts more easily.
2.To test the belts, you need to be able to move the belts. This requires the motors to be turned off. Go to the Manual Control tab in Repetier Host and click the "Stop Motor" button. You should now be able to move the extruder around without much resistance. 3..Pull the extruder forward and out of your way. 4Using the 2.5 mm hex driver, loosen the four 4 screws on the left side of your printer. This will allow the Y motor to move up and down. Note that you do not need to completely remove these screws as there is no need to remove this motor from the printer.
5.Using your hand, lift the Y motor enough to take the short loop of belt off the pulley attached to the motor. This belt is the source of most trouble with printing circles. If this is the only belt you wish to adjust, you can skip to step 11.
6.Loosen the screws on the inside of the pulleys on the left and right end of the back horizontal rod using your 1.5 mm hex driver. Make sure the back horizontal rod is centered by feeling the bearings that hold it on either side of the printer. You want to make sure it is even.
7.Push the extruder back and forwards. This movement should naturally align the belts, so that the back rod should not be moving side to side.
8.Once the belts are aligned, you can tighten the pulleys again with the 1.5 mm hex driver. The screws should be tight enough to hold on to the rod, but be careful not to strip the screws.
9.Put the short loop of belt back on the Y motor pulley by again lifting the motor up.
10.Make sure the two pulleys that the short loop of belt is on are aligned. If they are not, you can loosen the screw on the pulley on the back rod and carefully nudge it into place. Once it is aligned with the pulley on the y motor, tighten the screw.
11.Push the Y motor down firmly to draw the belt taut, and tighten the screws on the left side of the printer one-by-one to hold the motor in place.
12.Check that you can move the extruder back and forth. It may be a little resistant.
13.Slide the extruder forward so you can check the tension of the bottom belts behind the y carriages. These belts should be not too tight but not too loose. The most important thing is that they are of roughly equal tension.
14.You can tighten or loosen the bottom belts by adjusting the screw on the back of the y carriages with a 2.5 mm hex driver.
15.Now slide the extruder back to check the tension of the bottom belts in front of the y carriages. Again, these belts should be not too tight and not too loose. Using a 2.5 mm hex driver on the screws on the front of the y carriages, adjust the belts so that they are of roughly equal tension.
16.If the belts are still not moving smoothly, there may be a problem with the pulley alignment on the back horizontal rod. Using your 1.5 mm hex driver, loosen the screw on the pulleys so that you can move them into alignment, then tighten to hold them in place. This step can take some trial and error until you get everything properly aligned.
How to control on LCD

1.How to print from LCD
Note:
- 1)If you do not set the temperature of extruder and hot bed in g-code, you should manually heat up extruder and hotbed to proper temperature before printing.
- 2)If you do not set letting all the axes auto home in g-code, you should manually let all the axes auto home first.
- Press the button>"Print from SD">Choose the file you want to print and press button.


2.How to let all the axes auto home
- Press button on LCD> “Prepare”>“Auto home”

3.How to move the axis and extruder motor separately
- Press the button>”Prepare”>”Move axis”>”Move 10mm/1mm/0.1mm”>”Move X/Y/Z/extruder”>Rotate the button>Press the button
Note: The extruder motor can not move unless the temperature is more than 180 degrees.


4.What if you can not move the axis with you hand
Press the button>“Prepare”>”Disable steppers”

5.How to set the temperature of extruder
Press the button>“Control”>”Temperature”>”Nozzle”>Rotate the button>Press the button


6.How to set the temperature of hot bed
“Control”>”Temperature”>”Bed”>Rotate the button


Unblocking Procedures
Blocks can be extremely frustrating! We have provided procedures for unblocking printers.
Avoiding Blocks One easy way to avoid blocks is to lower your Z platform away from the nozzle tip while the extruder is heated and idling. In other words, when the extruder heater is turned on while the Z platform is adjacent to it, yet there are no jobs being printed, you will most likely get a block. The best rule of thumb is to put at least two inches of separation between the nozzle tip and the heated build platform any time you are not actively running a print job.
Types of Blocks
- The Stubborn Filament
- Sometimes filament gets stuck past the extruder drive gear and can be very difficult to remove. This can happen for a variety of reasons:
- Drive gear chewed through filament and became detached
- Filament ran out while unattended
- Filament broke mid print
- Extruded the starter filament too far
To remove the filament, your extruder must be hot and the idler swing arm should be open to prevent damage to the drive gear.
Tweezers
If the filament hasn’t gone far past the drive gear, this is the easiest method for extracting your filament. With the extruder hot and swing arm open, simply grab the end of the filament with a pair of tweezers and slowly pull the filament out.
Dental Pick
If the tweezers method is giving you trouble, and you have a dental pick laying around, use the tip of the dental pick to snag the filament and slowly pull it out. A stiff needle or pin may work as well but the curved tip of a dental pick is generally easier to work with.
Filament
If you still cannot pull the filament out, cleanly cut the end of fresh filament and feed the filament through the extruder head. Try pushing top of the old piece down into the extruder with the new piece of filament. You may have to try a couple times to get this to work.
Long Skinny Metal Object
We don’t recommend using this method, as rubbing metal against your drive gear may damage some of the teeth and cause improper extrusion. As a last resort, you may use a long skinny metal object to push the filament down into the hotend. MAKE SURE THE IDLER WHEEL IS OPEN!
The Cold Block
This is where the filament has become lodged in the PEEK barrel. This usually happens when a bit of filament has sheared off before extrusion. Because of this, it is keeping further filament from advancing through the tube. Since no heat is present in this part of the Me Creator, the filament cannot melt.
- Identification
You should suspect a cold block when your filament will not advance past the peak.
- Solution
The best thing to do, is to find an appropriate object to push the PEEK down into the hotter brass areas of the Me Creator. The hex wrench from the tool kit is perfect for this purpose. Alternatively, you can “fish” the filament out with a thin wire.
The Hot Block
The hot block involves filament forming a hard ball in the nozzle. It has been hypothesized that this happens when the filament burns inside the nozzle. The burned filament would be far harder than filament normally is, and much harder to melt through
- Identification
If your printer is extruding irregularly, or not at all, but the filament still attempts to feed, you may have the hot block.
- Solution
Hot blockcan be very frustrating to work with. You have a few options at your disposable.
- Solution 1: Break the block
You can try to use a sharp bit or wire or other similar implement to break through the block. If the blockis small, or easily broken this will be very easy, but it easy to imagine how this might not work every time.
- Solution 2: Remove Hot-End and Clean
This may be best when the blockis very stubborn. If you have read the section on Hot-End Replacement - It is usually advisable to contact us before taking the Me Creator apart. We do not recommend you remove your nozzle, or take apart your extruder.
Alternative: Acetone bath
An Alternative Solution would be to remove the Nozzle, and leave it to soak in acetone. This would (in theory) dissolve any remaining ABS, though it will not help PLA blocks. If you are going to attempt this, please remember that acetone puts of dangerous, flammable fumes. Acetone dissolves PEEK, so make sure you separate the nozzle from the rest of the machine if you are going to try this.
Cleaning the Drive Gear
To clean the drive gear, first remove the filament. Clean the drive gear by sticking a tooth brush through the access port to the left of the drive gear and scrubbing the drive gear. Pressing extrude on Repetier Host while no filament is loaded will spin the drive gear and allow you to clean the entire gear. Scrubbing the drive gear while it runs should not damage your extruder motor. Alternatively, if your printer is off or if you hit the STOP MOTORS button on Repetier Host, you will be able to spin the drive gear yourself using the knob that sticks out.
It may be neccessary to dig out particularly packed filament dust from between the teeth of the drive gear with a pointy object like a pair of needle nose tweezers or a needle. Filament dust packed in the drive gear will prevent the drive gear from properly gripping the filament and may affect your prints.
Finally, to ensure all filament dust is removed from the extruder assembly, you can use a can of compressed air to flush out any remaining filament dust.
detailes of me creator
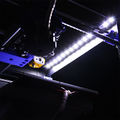
Internally installed LED strips 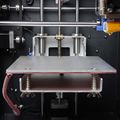
heatbed 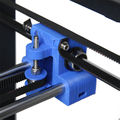
Belts of x,y axis 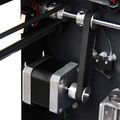
Belt of z axis 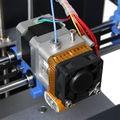
MK8 extruder 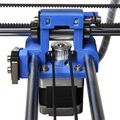
Print carriage


where to get
Get you own Me Creator here and have fun with it.