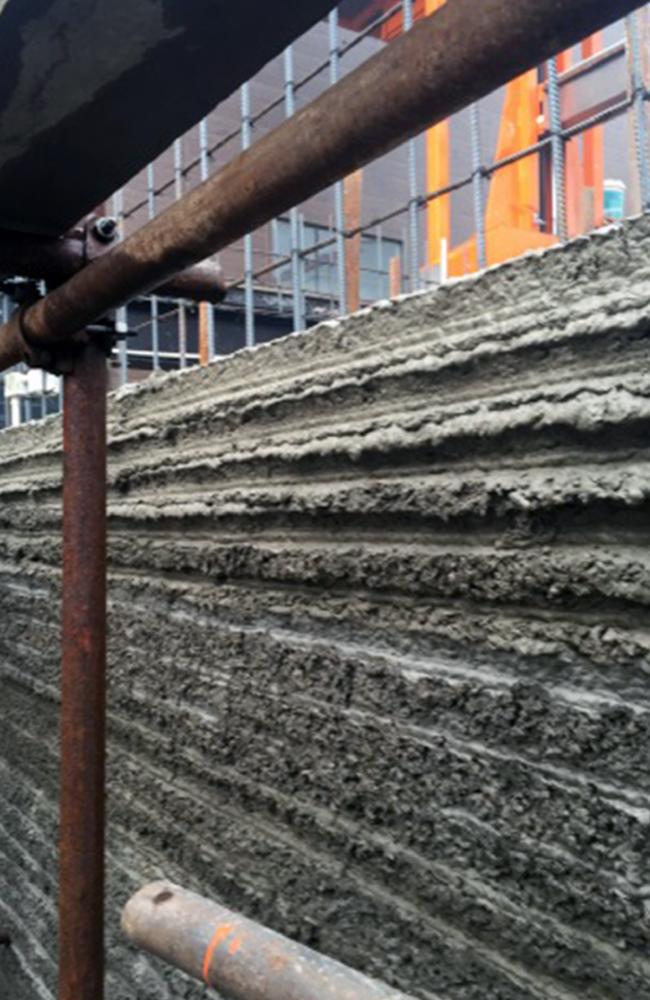
>

Blogs

Should we share 3D poison dart gun ?

A recent announcement by the US State Department has triggered a fresh wave of controversy surrounding 3D printed guns, online file sharing and the right to free speech, inciting maker and gun activist Peter Alaric DeSimone to 3D print and share the files for a .40 caliber poison dart airgun. The controversy truly began to heat […]

How to set up Acrylic Prusa I3 pro?

How to Connect 1. Plug the USB into your Prusa I3 and the other end into your computer. Do not be alarmed if the standard messages do not appear. Because of the Prusa I3’s drivers, it may show up as a generic USB device. 2. Power on the Prusa I3. You can see the LED lights and fan come to life! You may be able to hear the motors idling.  3. Open Repetier Host and ensure that you have a valid port selected for communications. To do this simply, click “Printer Settings” in the upper right-hand corner to bring up the printer settings menu.   4, Select GEEEtech PI3A in “Printer”   5. Select the corresponding COM port, click OK to continue.   If you can not fond the COM port, click “refresh ports” and see if it appears. (It is usually the last one; you can check the device manager to see which port it is). PS: if you still cannot find the port, please reinstall your USB driver.    6. Hit “connect” in the upper left-hand corner, select GEEEtech PI3A. You should see the details of the connection in the console window in the bottom section of the screen.   If it turned green, it is connected.    7. On the right panel, click the “Manual Control” tab. Scroll down and click both heat extruder and heat print bed buttons to activate your heaters. You will know they are on if they turn a bright blue.     The heat will gradually rise, as you will see from the status bar on the bottom of the window. The extruder should be set to 195° and the bed should be set to 95°.    8. At the same time, you can click the arrows on the above panel to move the motors to check if they work well. 9. Click “load” to load the STL. File you need to print.   You can see now the model in the cubic box and on the right of the panel, you can see the loading bar.   10. After loading, choose “slicer” > “configure” to set the printing configurations. You may need to wait for a minute.   11. First, you need to set the layers and perimeters. As you can see in the following picture, all you need to set is the layer height and the first layer height. Leave the rest as default. (For each setting, you can get a prompt to refer)   12. Set the printing infill density and pattern. Refer to the prompt.   13. Set the printing speed. Again, refer to the prompt.   14. Filament setting. You just need to fill in the correct filament diameter.   15. After setting, do not forget to save the settings and name each setting.  16. Select the settings you save on the right panel. Then click the “Slice with slice3r”to generate G- code. You may have to wait for a while.    17 click slicer button and slice with Slic3r.   You can see the small window on the screen, the duration for the generation of G-code depends on the size of your file. It may take 1-2 minutes.   After that, you can see the code in G-code editor. There are two parameters deserves your attention.   One is the bed temperature, another is the extruder temperature.   *Here is a temp reference. Filament Type Bed temp Extruder temp PLA 50-100 190-210 ABS […]

Introducing GT2560

GT2560 is a compact board that is integrated with the mighty function of the Arduino Mega2560+Ultimaker. The GT2560 can not only take full place the Arduino Mega2560+Ultimaker on respect of both software and hardware but has more premium features: the streamlined interfaces effectively avoid the unnecessary troubles, well-regulated compaction of components highly integrated saves more […]

Our new product—Iduino Yun Shield is on sale now

  Iduino_Yun_Shield, an extremely powerful development for Arduino board, is designed to solve the problems of connection and storage which exist in the Arduino board. Iduino_Yun_Shield runs Open Source OpenWrt System (Same system as runs in Arduino Yun) and it is fully compatible with Arduino IDE V1.5.4 or later versions. Yun Shield is an ideal […]

How to burn nor flash of 2440 with j-flash

Take qq2440 as example–Nor flash is AM291v160db (replace the type of flash: options/project settings/flash/select flash device. Install the jlink driver, connect and power it )              Open J-FLASH ARM.EXE (The default installation of the driver: C:\Program Files\SEGGER\JLinkARM_V408l)        2. Open s3c2440_norflash.jflash, which has been configured.       3. Open the program that you are going to burn:     4.Program: (F7 for shortcut key)