3D Printer Troubleshooting Guide to 19 Common 3D Printing Problems|Part Two
Today we will continue with our topic on “troubleshooting guide to 19 common 3D printing problems”, and provide practicable solutions for you 3D printing hobbyists!
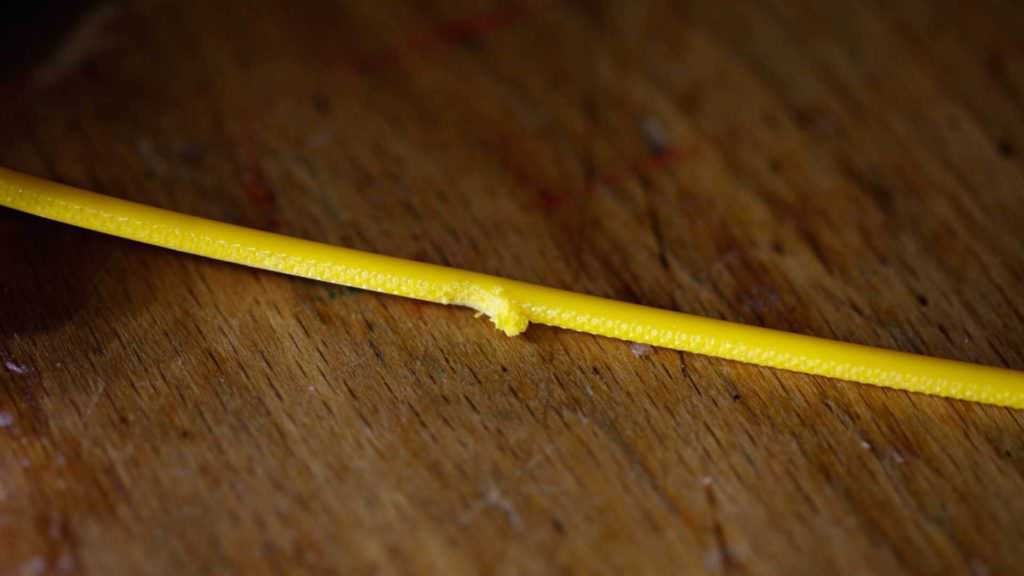
3D Printing Problems #10: Over-Extrusion
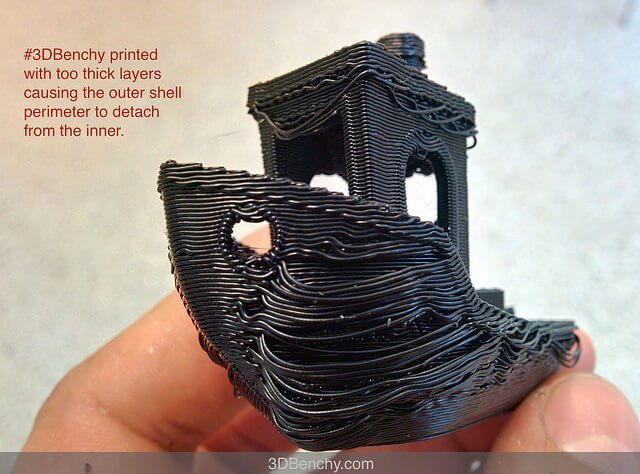
What’s the 3D Printing Problem?
Over-extrusion means that the printer supplies more material than needed. This results in excess material on the outside of the model printed.
What’s Causing this 3D Printing Problem?
Typically, the Extrusion multiplier or Flow setting in your slicing software is too high (see the section above)
3D Printer Troubleshooting: Over-Extrusion
- Extrusion multiplier. Open your slicer software and check that you have the correct Extrusion multiplier selected.
- Flow setting. If that all looks correct then decrease the Flow setting in your printer’s software.
3D Printing Problem Checklist: Over-Extrusion
- Check you have the right extrusion multiplier settings
- Decrease the filament flow settings
3D Printing Problems #11: Shifting Layers
What’s the 3D Printing Problem?
The lower and top layers shift so that you get a stepping effect through the print. Usually, it’s quite subtle, but these images show a print with a more pronounced effect.
What’s Causing the 3D Printing Problem?
There’s a variety of reasons for shifting layers, and these can be as simple as someone knocking on the printer during the print process! More involved shifting layer problems can be down to bent or misaligned rods, or even the nozzle catching on the print and causing a slight shift in the position of the platform.
3D Printer Troubleshooting: Shifting Layers
- Check that the printer is on a stable base. Place the printer on a stable base and in a location where it will avoid being knocked, pocked, and generally fiddled with. Even a small nudge of the printer can shift the print base and cause issues.
- Check the print base is secure. Most 3D printers use some form of detachable print base. Although this is handy when it comes to removing prints, and of course avoids damage to the printer, it also means that over time clips and screws can work loose. Make sure that when you reinstall the print platform it’s clipped or bolted tightly in place to avoid any slip or movement.
- Watch out for warped upper layers. If you’re printing a high-quality print upper layers can easily warp if cooled too quickly. As the layers warp they rise and can obstruct the nozzle as it moves, in most cases, the print will release from the platform, but if it doesn’t the powerful stepper motors can push the print and platform around. If your prints are suffering from warping in the upper layers try reducing the speed of the fans slightly.
- Printing is too fast for your machine. It is possible to speed up the print times for your machine by increasing temperature and flow. However whilst this may result in the filament flowing in the correct quality the rest of the machine may struggle to keep up. If you hear a clicking during printing this could be a sign that the printer is going to fast. If you do hear a click the first port of call is to check that the filament isn’t slipping before you take a look at the actual printer speed. To adjust your printer’s speed open up your slicer software and change the print speed.
- Check the belts. If layers are still shifting then it’s time to check the belts. A quick check is to just go around all belts and pinch the two together. The tension in each belt should be the same, if not then you’ll need to adjust the belt position to even out the belt tension. Over time the rubber belts will stretch (You can often tell if they do as they’ll start to slip on the drive pulleys), if there is quite a bit of play in the belts then it’s time to replace them with new ones. Over-tight belts can also be an issue but this is usually only a problem if you’ve built the machine yourself. Some printers such as the Prusa i3 have belt tensioning screws that enable you to easily adjust the belt tensions.
- Check the drive pulleys. These are usually connected directly to a stepper motor or to one of the main rods that drive the print head. If you carefully rotate the pulley you’ll see a small grub screw. Hold onto the rod take hold of the attached belt and then tug the belt and try to force the pulley to turn. You should find that there is no slip between the pulley and stepper or rod if there is tighten the grub screw and try again.
- Check the rods are clean and give them some oil. Over time debris can build up on the rods which means that at some points along their length, they cause more friction than others, which in turn can affect the free movement of the head and again cause layer shifting. A quick wipe and re-oil of the rods usually solves the issue.
- Bent or misaligned rods. If you see the print head falter at certain points then it could be that one of the rods has become slightly bent. You can usually tell by switching off the machine so there’s no power going through the steppers and then moving the print head through the X and Y axes. If you feel resistance then you know something is amiss. Start by seeing if the rods are aligned, if then remove the rods and roll them on a flat surface. If any are bent then it will be quite obvious.
3D Printing Problem Checklist: Shifting Layers
- Check that the printer is on a stable base.
- Check the print base is secure.
- Watch out for warped upper layers.
- Printing is too fast for your machine.
- Check the belts.
- Check the drive pulleys.
- Check the rods are clean and give them some oil.
- Bent or misaligned rods.
3D Printing Problems #12: Blocked Bowden Nozzle
What’s the 3D Printing Problem?
You initiate a print job but whatever you try, nothing comes out of the nozzle. Extracting the filament and reinserting doesn’t work.
What’s Causing the 3D Printing Problem?
A small piece of filament has been left behind in the nozzle after changing spools, often because the filament has snapped off at the end. When the new filament is loaded, the piece of old filament that is left in the nozzle doesn’t allow the new filament to be pushed through.
Alternatively, a build-up of molten plastic at the end of the nozzle has hardened and will need manual removal. Specialist, cheap, or old filaments are a common cause.
3D Printer Troubleshooting: Blocked Bowden Nozzle
- Unblock with a needle. If you’re lucky then unblocking can be a quick and easy process. Start by removing the filament. Then using the control panel select the “heat up nozzle” setting and increase to the melting point of the stuck filament. In the case of the Ultimaker 2 go to Maintenance > Heat Up nozzle. For PLA set the temperature to 220 C. Once the nozzle reaches the correct temperature, use a small pin to clear the hole (being careful not to burn your fingers). If your nozzle is 0.4mm then you need a smaller pin; an airbrush cleaning kit works perfectly. It’s also worth getting a brass cleaning brush to remove any filament build-up on and around the nozzle.
- Push old filament through. If you find that the nozzle is still blocked then you may be able to push the filament through with another bit of filament. Start by removing the filament as before and then remove the feeder tube from the print head. Heat the hot end to 220 C for PLA and then using another piece of filament push this through from the top to try to force the stuck filament in the nozzle out. Usually, if new filament hasn’t succeeded in unblocking then the extra pressure you can exert by hand might just do the job. However, don’t push too hard as you’ll bend the horizontal printer rods.
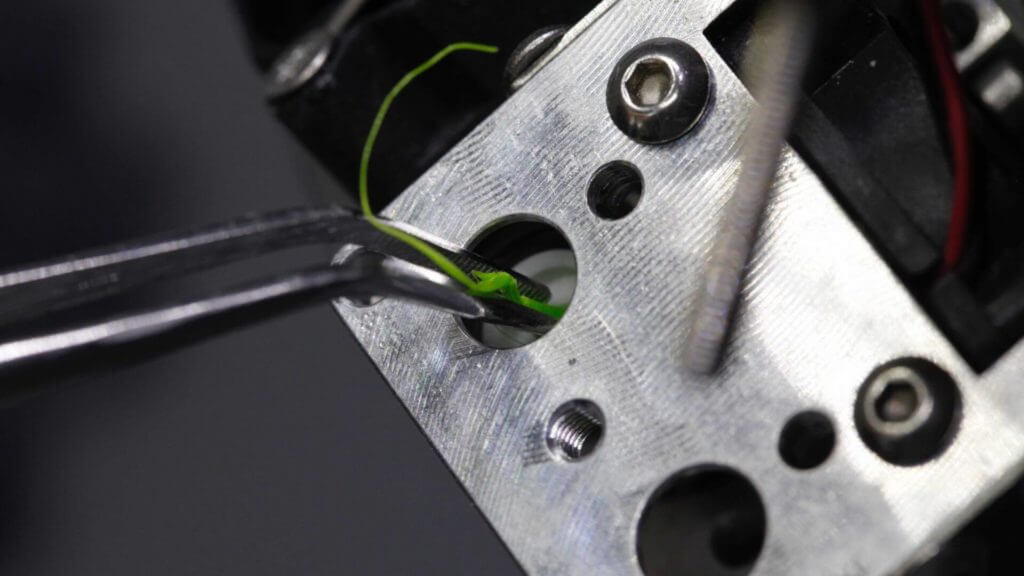
Once the end clears use a needle to push through the nozzle and a brush to clean any filament excess. - Dismantle and rebuild the hotend. In extreme cases when the nozzle remains blocked, you’ll need to do a little surgery and dismantle the hot end. If you’ve never done this before then it’s a good idea to make notes and take photographs so you know where everything fits when you reassemble. Start by removing the filament, then check your printer’s manual to see exactly how to dismantle the hot end.
In the case of the Ultimaker 2, it’s all quite straightforward. At all times during this procedure be aware that the hot end will get hot so a pair of heatproof gloves is advised (e.g. welder’s gloves).
For the Ultimaker 2 move the print head to the center of the printer. Undo the four screws on top of the print head and let the hot end and fans hang down.
Increase the temperature of the hot end to 220 C (For PLA) and wait for the hot end to reach the temperature. Once the printer reaches the correct temperature switch off the power.
Holding onto the plastic fan housing use a pair of tweezers through the top of the nozzle to grab hold of the offending filament and extract.
Use a needle to push all the way through and then a brass cleaning brush to remove any excess filament.
Switch the printer off and leave it to cool.
Once completely cool reassemble, switch on, and load a new spool of filament.
3D Printing Problem Checklist: Blocked Bowden Nozzle
- Heat the nozzle and clean with a needle and brass cleaning brush
- Remove the feeder tube and try pushing the filament through with another piece of filament
- Dismantle the hot end and see if you can extract the filament blockage
3D Printing Problems #13: Snapped filament
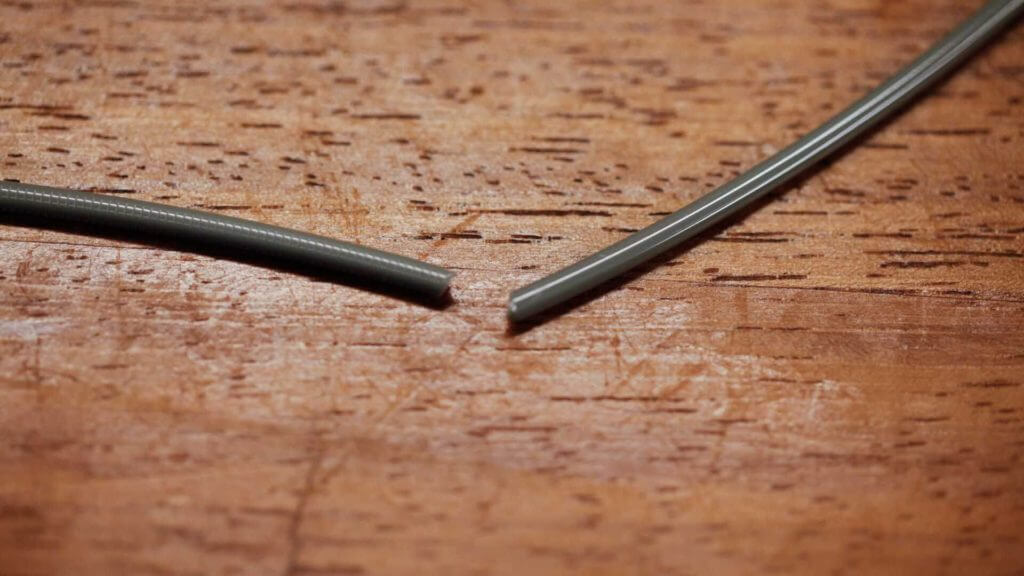
What’s the 3D Printing Problem?
The filament spool still looks full, and when you check there appears to be a filament in the feed tube, but nothing’s coming out of the nozzle. This is more of an issue with Bowden feed printers than direct feed as the filament is hidden so breakages aren’t always immediately obvious.
What’s Causing the 3D Prinseveralting Problem?
Caused by several issues but primarily old or cheap filament. Although the majority of filaments such as PLA and ABS do last a long time, if they’re kept in the wrong conditions such as in direct sunlight then they can become brittle. Then once fed into the printer no amount of adjustment is going to help.
Another issue is filament diameter, and this can vary by manufacturer and batch. Sometimes if the idler tensioner is too tight then some filament that still has a good amount of life left in it can snap under the pressure.
3D Printer Troubleshooting: Snapped Filament
- Remove the filament. The first thing to do is to remove the filament from the printer in the usual way. In the case of the Ultimaker select Maintenance and Change Material. As the filament will usually have snapped inside the tube you’ll need to remove the tube from both the extruder and hotend. Then heat the nozzle and pull out the filament.
- Try another filament. If after reloading the filament it happens again, use another filament to check to see if it’s not just the old brittle filament that should be disposed of.
- Loosen the idler tension. If the new filament snaps check that the idler tensioner isn’t too tight by loosening all the way. As the print starts to tighten until there is no slippage of the filament.
- Check the nozzle. Check the nozzle isn’t blocked and give it a good clean.
- Check flow rate and temperature. If the problem continues check that the hotend is getting hot and to the correct temperature. Also, check that the flow rate of the filament is at 100% and not higher.
3D Printing Problem Checklist: Snapped Filament
- Check the filament isn’t past its best
- Check the filament diameter
- Adjust the idler tension
- Check that the hot end is clear and reaches the correct temperature
- Set the flow rate to 100%
3D Printing Problems #14: Stripped filament
What’s the 3D Printing Problem?
Stripped or slipping filament can happen at any point of the print process and with any filament. The result is that no filament is extruded from the hot end bringing your print to an abrupt end.
What’s Causing the 3D Printing Problem?
Blockage, loose idler tensioner, and wrong hotend temperature are just a few of the common causes, but all are usually easy to correct. The result of the problem is that the knurled nut or toothed gear in the extruder is unable to pull or push the filament through the printer. As the motor spins the small teeth on the gear that would usually grip and feed the filament through the system, instead wear it away until there is no longer any grip, and the gear and filament slip.
3D Printer Troubleshooting: Stripped Filament
- Help feed the system. If the filament has just started to slip, you can usually tell by the noise and the appearance of plastic shavings, then apply some gentle pressure to the filament to help it through the system. This will often help to get the machine to print smoothly again.
- Adjust the Idler tension. Start by losing the idler, feed in the filament, and tighten until it stops slipping. Filaments vary in diameter so although the idler will absorb some difference in diameter some filaments will require fine adjustment.
- Remove the filament. In most cases, you’ll need to remove and replace the filament and then feed it back through the system. Once the filament has been removed cut the filament below the area that shows signs of slipping and then feed back into the system. If the filament has snapped it may be passed its usable best. Try it again and if it snaps again and you find the filament appears brittle discard and use another filament.
- Check the Hot end temperature. If you have just inserted a new filament as the issue started, double-check that you have the right temperature.
3D Printing Problem Checklist: Stripped Filament
- Help feed the system
- Adjust the idler tension
- Remove the filament
- Check the hot end temperature
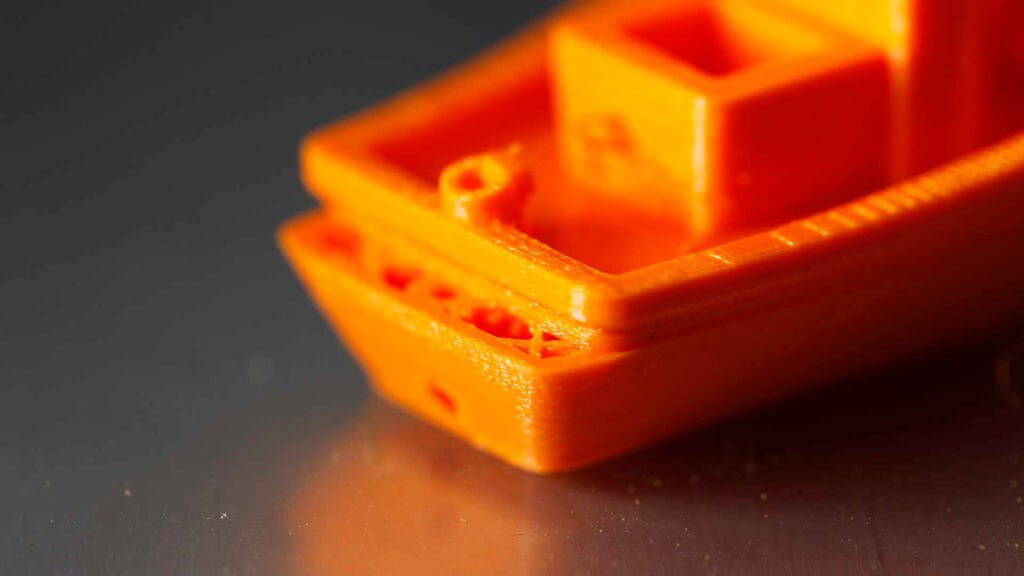
3D Printing Problems #15: Broken Infill
What’s the 3D Printing Problem?
The internal structure of your print is missing or broken.
What’s Causing this 3D Printing Problem?
There are several reasons for the misprinting of the internal structure. The most common is incorrect settings within the slicing software, but it can also be due to a slightly blocked nozzle.
3D Printer Troubleshooting: Broken Infill
- Check the Fill density. In your slicing software check the infill density. A value of around 20% is normal; any less than this and you’re likely to have issues. For larger prints, you may want to increase this to ensure that the model has enough support.
- Infill Speed. The speed at which the infill is printed can have a major effect on the quality of the structure. If the infill is looking weak then decrease the infill print speed.
- Change the pattern. Most slicing software enables you to change the internal structure. You can have a grid pattern, triangle, honeycomb, and more. Try selecting a different option.
- Check your nozzle. It might be that there is a slight blockage in the nozzle. While the blockage doesn’t affect the printing of the thicker exterior walls because there is less flow for the internal structure the filament is getting caught.
3D Printing Problem Checklist: Broken Infill
- Check and adjust the Fill Density
- Decrease the Infill Speed
- Try a different infill pattern
- Check your nozzle for blockages
3D Printing Problems #16: Ghosting of the Internal Structure
What’s the 3D Printing Problem?
The final print looks fine but an outline of the internal support structure can be seen through the walls of the print.
What’s Causing this 3D Printing Problem?
The ghosting issue happens due to the infill encroaching into the path of the perimeter. This effect is most visible when your print has thin walls. The problems are caused by the infill structure overlapping with the perimeter line as it’s being laid down. Although this ghosting is an issue it’s an important part of the printing process, as it helps the internal structure bond effectively to the external walls. Luckily it’s very easy to overcome.
Another cause of ghosting can be that you have set an incorrect wall thickness about the size of the nozzle that you’re using. In normal print conditions, the size of the nozzle should be directly related to the nozzle size, so if you have a 0.4mm nozzle then the wall thickness should be a multiple of this, either 0.4, 0.8, 0.12, and so forth.
3D Printer Troubleshooting: Ghosting of the Internal Structure
- Check the shell thickness. Make sure that the value you have selected for the shell thickness is a multiple of the nozzle size.
- Increase the shell thickness. The easiest solution is to increase the shell thickness. By doubling the size it should cover any overlap caused by the infill.
- Use Infill after perimeters. Most slicing software will enable you to activate Infill prints after perimeters.
- In Cura open up the ‘Expert Settings’ and under the Infill section tick the box next to ‘Infill prints after perimeters’
- In Simply3D Click ‘Edit Process Settings’ then select ‘Layer’ and under ‘Layer Settings’ select ‘Outside-in’ next to the ‘Outline Direction’.
- Check print platform. Check the model and if you see that the effect is more prevalent on one side than the other, the effect could be due to calibration. If so run through the usual calibration process.
- Use it to your advantage. Depending on the type of model that you’re printing you can use the internal and shell printing order to your advantage. When you want a high-quality print with a good surface finish where the actual strength of the model isn’t important, select print from the Outside-in. If however the strength of the print is paramount then select Print from Inside-Out and double the wall thickness. The reason for the difference in strength is that when you print from the Outside-in you eliminate the small amount of overlap that causes the ghosting issue, but this also means that the actual structure won’t create the same strength of the bond between the internal and external structure due to the lack of overlap.
3D Printing Problem Checklist: Ghosting of the Internal Structure
- Check the shell thickness.
- Increase the wall thickness.
- Use Infill after perimeters.
- Check the print platform and recalibrate if necessary.
- Use it to your advantage.
3D Printing Problems #17: Gaps between Infill and Outer Wall
What’s the 3D Printing Problem?
When you look at the top or bottom of the print, you can see a slight gap between the infill and the outer perimeter walls.
What’s Causing this 3D Printing Problem?
Gaps between the perimeter and top layers used to be a common problem, but as printer accuracy has improved and the support for different materials extends, it’s now less of an issue than it was.
However the new wave of advanced materials are far less forgiving than the likes of PLA and ABS, and we’re starting to see a slight resurgence of the problem.
Gaps are caused by the filament used for the infill and outer walls not quite meeting bonding and are a relatively easy fix.
The most obvious cause of the problem is that the infill overlap is not set, or it’s set to “0”. This means that the slicing software is telling the printer not to allow the two parts of the print to meet.
Another issue could be the order in which you have set the infill and outer perimeters to be printed. If you’re printing the perimeter first for a high-quality print then there is generally little or no overlap which can again cause the problem.
3D Printer Troubleshooting: Gaps between Infill and Outer Wall
- Check the infill overlap. This is by far the most common issue and is easy to resolve. In your slicing software locate the ‘Infill Overlap’ option and increase the value.
- In Cura by default, this is set to 15% so raise it to 30%.
- In Simplify3D you’ll find the option in ‘Edit Process Settings > Infill > Outline Overlap’ again to increase the value. This setting is directly linked to the extrusion width, so the % value will be a % of whatever you’re extrusion width is. When adjusting this setting always keep it below 50% or you’ll start to see the effects of the overlap in the outer perimeters of your print.
- Printing infill before the perimeter. If you’re printing with a relatively thin outer wall the structure of the infill can show through. If this happens then you can switch the order by which the printer lays down the infill and perimeter layers. For example, in Cura check to see if you have ‘Infill prints after perimeters’ ticked.
- Increase Hot end temperature. Some of the latest advanced materials such as XT-CF20 are a little less forgiving when it comes to spreading due to the carbon fibers that make up part of their structure. When printing with these materials you may find that a slight 5-10º increase in hotend temperature makes all the difference.
- Slow it down. Okay, so you may be in a rush to get the printout, but printing at higher speeds can cause all sorts of issues if the printer isn’t perfectly calibrated. If you need to print quickly you can still avoid gaps by decreasing the speed of the top layer.
3D Printing Problem Checklist: Gaps between Infill and Outer Wall
- Check the infill overlap.
- Printing infill before the perimeter.
- Increase Hot end temperature.
- Slow it down.
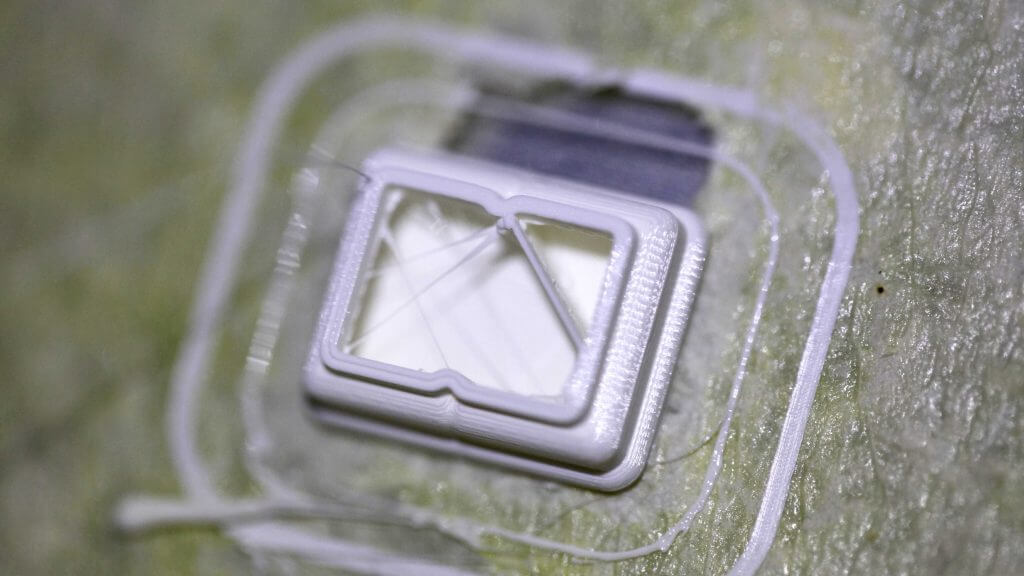
3D Printing Problems #18: Non-Manifold Edges

What’s the 3D Printing Problem?
Parts of your print are missing or the final print is weak and falls apart despite the exterior quality of the print looking fine. Sections of the print look completely different from the print preview or the final print has geometry errors that make no sense.
What’s Causing this 3D Printing Problem?
Non-manifold edge is the common cause of misshapen or odd prints. Non-manifold edges are the edges of models that can only exist in the 3D space and not the physical world.
For example, if you have two cubes in the real world and try to overlap them directly, it’s physically impossible as the solid outer walls prevent the two objects from intersecting.
In the 3D world you can simply intersect the two, they still exist as individual objects, but the software we use also enables them to intersect in the virtual world.
In order to get the two to print correctly, the objects need to be merged so that any inner walls are removed and an object with a single undivided inner cavity is left.
Another common cause is if you have an object such as a cube and delete one of the surfaces. You essentially have an object with a hole, it might look like a shape with five sides, but it only exists in the virtual 3D space, this is geometry with no physical form.
Although you can see the outer walls in the software, the walls that meet the hole only have dimensions in two axes. The third dimension which we see as the thickness of the wall is only illustrative and has no real physical dimension. When it comes to slicing the model the software does its best and in many cases will repair the hole, however, in more complex models the effects can be interesting, to say the least.
3D Printer Troubleshooting: Non-Manifold Edges
- Use the latest slicer software. Most of the latest slicer engines all support the automatic fixing of non-manifold edges but it’s still good practice to ensure that your models are correctly formed and print ready.
- Fix in Horrible in Cura. In Cura open Expert Settings and make sure that under ‘Fix Horrible’ you have Combine everything (Type-A) ticked.
- Fix ‘Non-manifold’ in Silmplify3D. In edit ‘Process settings’ click the ‘Advanced’ tab and select ‘Heal’ next to ‘Non-manifold segments.
- Use the layer view. In your slicer software use the layer view to check through the model so you can see where the issues appear. A quick slide through the layers will often highlight an easy-to-fix problem.
- Use software to fix issues. One of the easiest ways to fix models with non-manifold edges is to use software; Blender and Meshmixer both have features built in that will quickly enable you to highlight problems with your models and fix them before slicing.
- Merge objects. It’s better to fix your 3D models before importing them into your slicing software. To do this, make sure that when you have two objects that do intersect or overlap you choose the appropriate Boolean function to either intersect, merge, or subtract.
3D Printing Problem Checklist: Non-Manifold Edges
- Keep your slicer software up to date.
- “Fix Horrible” (in Cura).
- “Fix Non-manifold” (in Simplify3D).
- Use the layer view to check for mistakes.
- Use software like Blender or Meshmixer to fix issues.
- Merge objects.
3D Printing Problems #19: Model Overhangs
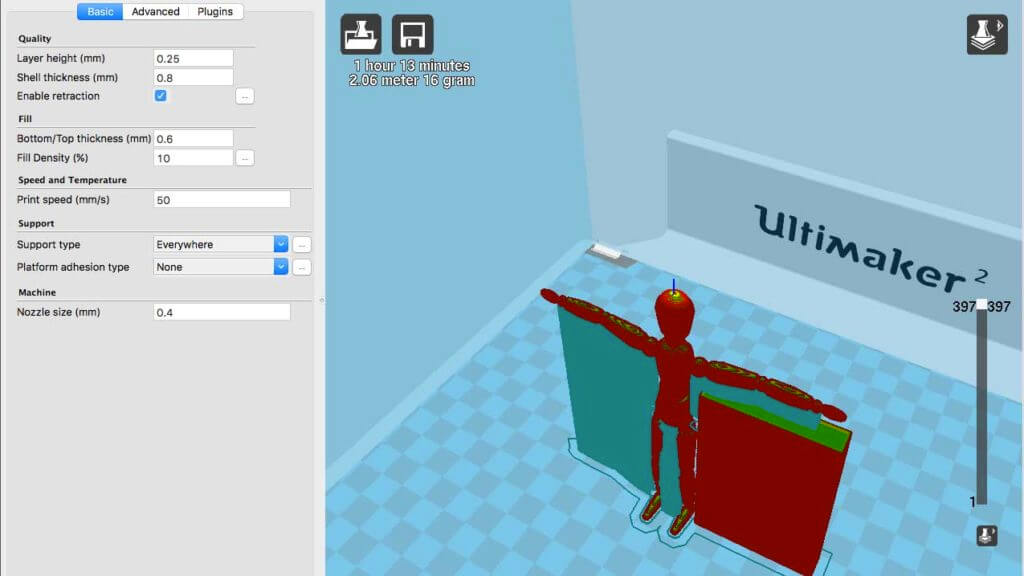
What’s the 3D Printing Problem?
You load your print into your slicing software and everything looks good. Hit print and you find that some parts of the model print fine, whilst other parts end up as a stringy mess. OK, this might seem obvious and the issue of overhangs is often seen as a 3D printing rookie mistake. But it’s surprising just how often even experienced 3D printers are hit with an overhang issue.
What’s Causing this 3D Printing Problem?
The process of FFF requires that each layer is built upon another. It therefore should be obvious that if your model has a section of the print that has nothing below, then the filament will be extruded into thin air and will just end up as a stringy mess rather than an integral part of the print.
Really the slicer software should highlight that this will happen. But most slicer software will just let us go ahead and print without highlighting that the model requires some type of support structure.
3D Printer Troubleshooting: Model Overhangs
- Add supports. The quickest and simplest solution is to add support. Most slicing software will enable you to do this quickly. In Simplify3D click Edit Process Settings > Support > Generate support material; you can adjust the amount, pattern, and settings. In Cura just click the Support type from the Basic settings.
- Create in-model supports. Supports generated by software can be intrusive so creating your own in your modelling application is a good alternative. It takes a bit more skill but can enable some fantastic results.
- Create a support platform. When printing a figure, arms and other extrusions are the most common areas that cause problems. Using supports from the print bed can also cause issues as they often have to span quite large vertical distances; for structures that are supposed to be easily removed and fragile, this distance is prime for causing problems. Creating a solid block or wall under arms etc and then creating a smaller support between the arm and block can be a great solution.
- Angle the walls. If you have a shelf-style overhang then an easy solution is to slope the wall at 45º so that the wall supports itself and removes the need for any other type of support.
- Break the part apart. Another way to look at the model is to break it apart and rather than print in one section make two. With some models, this enables you to flip what would be an overhang and make instead make it a base. The only issue with this is that you then have to find a way of sticking the two parts back together.
3D Printing Problem Checklist: Model Overhangs
- Add supports
- Create in-model supports
- Create a support platform
- Angle the walls
- Separate the model and print smaller parts
- Now all the potential troubles that might pop up during printing are all listed here. Hope that these two posts will make your creative process smoother and more fascinating!