Self-made Telephone Dialer with Arduino
How to make a call? It could be simple: pick up the receiver and dial a number on the dial pad.
However, have you ever thought to pick up the receiver and put it through without touching the dial pad? The answer is definite.
We hereby introduce how to generate a dual-tone multi-frequency signal with Arduino below.
How to use
To make a call, we pick up the receiver, put the speaker close to the microphone, and send a phone number (such as 10000) via serial port. Then the phone can be put through a moment later.
Extended usage
The driven switch simulates the phone off-hook event and makes dialing with the circuit; then, Arduino sends different voices to the telephone line based on Event Control Voice Modules (WT588D, etc.). That forms a complete automatic dialer. In addition, an alarm or telephone reminder can also be prepared.
List of Materials:
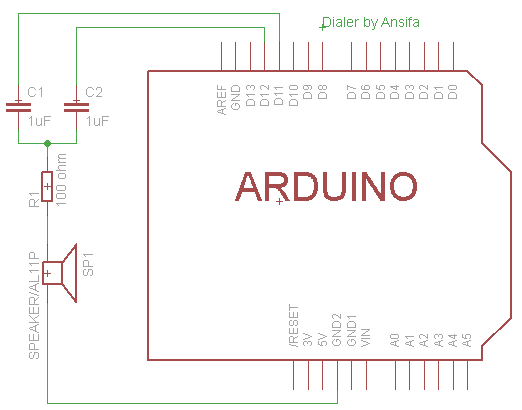
Arduino: 1 piece;
Speaker: 1 piece;
100Ω resistor: 1 piece (100Ω~1kΩ for option);
1uF capacitor: 2 PCS (0.1uF~10uF for option).
Hardware Connection
Program Code:
- Download the Tone library and unzip it to the Arduino-0022\libraries folder: http://rogue-code.googlecode.com/files/Arduino-Library-Tone.zip.
Compared to the built-in tone function, this Tone library can output different frequencies of waveforms at multiple output pins; but the built-in tone function can only make output at one pin for a period.
2. Write the following codes into Arduino:
/*

Use Arduino to generate dual-tone multifrequencyAnsifa

*http://rogue-code.googlecode.com/files/Arduino-Library-Tone.zip

*/

#include

String Phone_Number = "";

int i = 0, mark = 0;

[url]http://zh.wikipedia.org/zh/%E5%8F%8C%E9%9F%B3%E5%A4%9A%E9%A2%91[/url]

Tone freq1;

Tone freq2;

const int DTMF_freq1[] = {1336, 1209, 1336, 1477, 1209, 1336, 1477, 1209, 1336, 1477};

const int DTMF_freq2[] = {941, 697, 697, 697, 770, 770, 770, 852, 852, 852};

void setup()

{

Serial.begin(9600);

freq1.begin(11);

freq2.begin(12);

}

void loop()

{

while (Serial.available() > 0)

{

Phone_Number += char(Serial.read());

delay(2);

mark = 1;

}

PlayDTMF(Phone_Number, 200, 300);
if(mark == 1)
{
Phone_Number = “”;
Serial.println();
mark = 0;
}
}
/*
void PlayDTMF(String Number, long duration, long pause)
{
if(Number.length() == 0 || duration <= 0 || pause <= 0) return; for(i = 0; i < Number.length(); i++) { if(Number[i] >= '0' && Number[i] <= '9') { Number[i] -= '0'; Serial.print(Number[i], DEC); freq1.play(DTMF_freq1[Number[i]], duration); freq2.play(DTMF_freq2[Number[i]], duration); delay(pause); } } }
Physical Effect
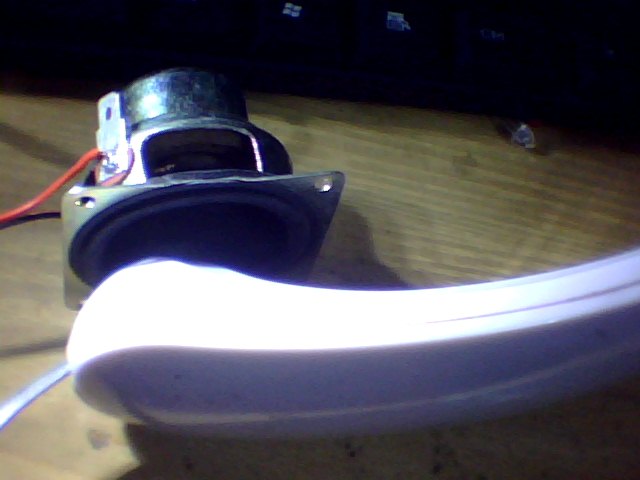
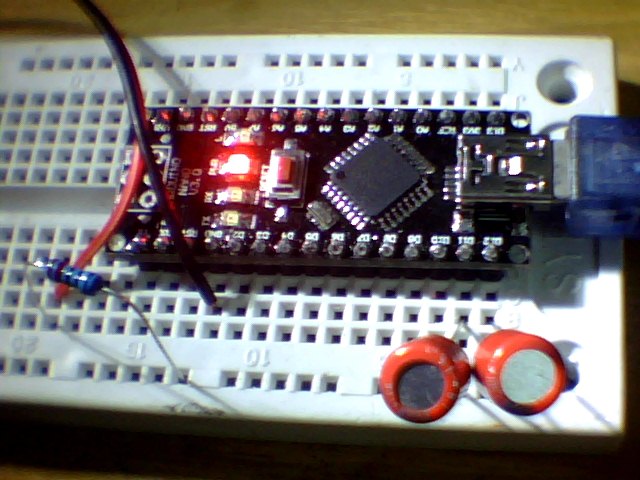
1. Connect the circuit.
2. Put the speaker close to telephone for dialing.