Me Ducer
Contents
Introduction

Me Ducer is the sixth gerneration of desktop 3D printer made by Geeetech, it is a portable cantilever type 3D printer with two handles, suitable for any place like home, office, lab, or classroom. To increase the stablity of cantilever type design, Me Ducer adopts 12mm-diameter superior hardness, wear resistance, oxidation resistance and carbon steel bearings for Y and Z axis, effectively avoiding vibrations during printing and making it more accurat for the positioning of Y and Z axis. In addition, we add a manually adjusting knob on the top of the machine which is used for the fine-tuning of Z axis.
As the companion piece of the Me Creator , Me Ducer continues with its overall look of solemnity and high-quality, but the high gloss piano black finished acrylic chasis adds even more panache and elegance to Me Ducer. Besides the consideration of art and aesthetics, 8mm industrial-strength acrylic chasis ensures incredible strength and durability.
Compared to its predecessors, the extruder of Me Ducer is no longer exposed barely, instead, we add a hood to cover the extruder which is crafted out of high-quality steel. So is the main control system, which is built in the base case. On one hand, it looks good and on the other hand, it offers a large degree of protection to the kids or pets from the high temprature of the extruder, creating a safer and more comfortable printing experience.
Features
- No assembly required, plug-and-play.
- Make high-resolution printing objects.
- Brand new look. Suitable for home, office, lab, or classroom.
- 8mm -thickness gloss piano black acrylic chasis for strength and durability.
- 12mm-diameter steel bearings for more accurate positioning.
- In- built control system, extending service life.
- Compatible with Mac/Linux/Windows.
- With LCD control panel, support off-line printing.
- SD Card Reader support
- With Heatbed, both PLA and ABS are printable
- Compact and portable, easy to be carried
See more tetails

filament spool 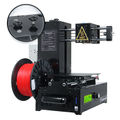
fine-tuning knob 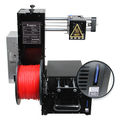
SD card slot 
handle and bearing 
Aircraft-grade aluminum print plate


Specifications
Printing
Print Technology: Fused Filament Fabrication(FFF)
Build Volume: 180 x 150 x 150mm
Layer Resolution: 0.1-0.3mm
Position accuracy of X/Y axis: 0.01mm
Position accuracy of Z axis: 0.005 mm
Filament Type:ABS/ PLA
Filament Diameter: 1.75 mm
Nozzle Diameter: 0.4 mm
Software
Software: Repetier-Host,Printrun
File Types: .stl
Supports: Windows/Mac/Linux
Temperature
Max Heated Bed Temp: about 110 ℃
Max Extruder Temp: about 240 ℃
Eectrical
Power Input: 100-120VAC/4.8A or 200-240VAC/2.4
Power output:DC12V/ 29A
Connectivity: USB, SD card (support off-line printing)
Support heatbed: Yes
Mechanical
Body: high strength and hardness Industrial-strength Acrylic
Build Platform: Aircraft-grade aluminum
XYZ Bearings: carbon steel
Stepper Motors: 1.8° step angle with 1/16 micro-stepping
Physical structure: Cantilever type
Physical Dimensions
Machine Dimensions: 300 x 300x370(mm)
Machine weight (Net weight): 10 kg
Print Plate Size (Build Platform): 180x155x3mm
Install the drivers and software
Install the drivers
Installing Drivers Before printing, you’ll need to install drivers. The kind of driver that a Me Ducerrequires in order to operate properly is called a USB Serial Driver. A USB Serial Driver is software that establishes a COM port.
Plug the USB into a USB port on your computer. Windows Update should automatically find and install the drivers. You’re done with installing the drivers!
Windows 8
When you attempt to install the unsigned 3rd party driver on Windows 8, you will most likely not be able to install because the file is not digitally signed. To get around this restriction, you must temporarily remove this restriction by following the instructions here .
Once you have followed the directions to disable driver signature enforcement, download the driver and click to install. This is only a temporary change, however, and restarting your computer after you have installed the driver will return your computer to its normal state.
Note that this involves restarting your computer, so make sure to close out all other windows. You may want to print out these instructions so you can refer to them while your computer is restarting.
Windows Manual Install
Note: In some cases the drivers will not install on their own. The drivers for Windows can be found in the following link: Media:Serial install.zip
If the driver was not automatically installed, you may see this screen:

In this case, a. Click “Change Settings…” b. Select “Install driver software from Windows Update”. c. Click “Save Changes”. The FTDI drivers should now install successfully.

Attention: For those having difficulty selecting your COM port
If you have installed the USB serial driver successfully and you are still not able to connenct to your printer in Repetier Host, then windows has not recognized the newly installed driver. In Repetier Host, you may even notice an error message that is similar to this one:
Serial com error:System.IO.Ports.SerialErrorReceivedEventArgs
In some situations, a computer running windows will not automatically recognize a newly installed Serial driver. This means that you will have to update your newly installed driver manually.
To manually update the driver, you will first need to plug the USB cable into your printer and attache the other end directly to one of your computer’s USB ports. Now, enter the ‘Device Manager’ in Windows and navigate to the hardware category called Ports (COM & LPT) and then left click on it once. You should notice the Ports category expand to reveal a Sub-Category called USB Serial (Communication Class, Abstract Control Model) (COM X); where X is the COM port number. You should be looking for that COM port number in Repetier Host after this procedure is completed; which can be found in “Printer Settings.”

You will need to right click on the USB Serial Sub-class and select proprties. In the drivers tab you will find a selection to update drivers, click on Update Drivers to access the next menu.
Now that you have selected which driver to update, you will have to tell Windows where the “updated” driver can be found. You should be presented with two options. Select “Browse my computer for driver software” to locate and install the driver software manually.

Next, you will be greeted by a menu that allows you to “Browse for driver software on your computer” You will be presented with two choices, select “Let me pick from a list of device drivers on my computer.” Now select the Serial port device and proceed with the installation.

That is pretty much all there is to it. You will then see an installation indicator bar.

Once the installation is complete you will be notified that “Windows has successfully updated your driver software.” You will be prompted to restart your computer; you should do so.

Macbook Manual Install
Download link of driver: http://www.ftdichip.com/Drivers/VCP.htm
Download the driver that is compatible with system version.
Open the downloaded file, you will see a .pkg file, Open "FTDIUSBSerial.pkg"

Click "Continue" in Instruction.

Click "Continue" in Read me.

Click "Continue" in License.

Click "Agree" to continue installation.

Select the installing destination and click "Continue".

Click "Install" in Installatin Type.

Mac will start to install the driver:


Once your computer restarts, try selecting the appropriate COM port and baud rate in Repetier Host and then connect.
Install Software
we will take windows OS as an example.
To install all required software by Me Ducer, please follow the steps provided below.
1) Download and install: RepetierGEtechSetup.exe
step 1,start the installer,choose the display language. step 2,click next to continue

step3,select the destination where you would like to install the RepetierGEtechSetup.

step4,select start menu folder and create a shortcut, click next to continue.

step 5,get ready to install. Click install.

step 6,wait about half a minute while installing. The green bar will show you the rate.

step 7,set up has finished the installing, you can choose to launch it immediately or exit out.

In Mac, you can download Repetier for Mac" at:
After downloading, open "Repetier-Host-Mac_56.dmg",then you will see the icon of "Repetier Host", open it.

2) Plug the power cord into a wall outlet and the USB cable into a USB port on your computer. Windows should detect your motherboard and assign the appropriate driver.
3) Open Repetier Host and Connect to your Me Ducer!
Click on the Manual Controls Tab and click in a direction X or Y to test your connection. If you are having difficulty connecting, please review the following supportive documentation: Installing Drivers and How to connect.
Please note that if you have difficulty connecting, there might have been an issue with the installation process. Ensure that the following have been installed:
Download and install the Serial Driver.
Download and install Microsoft .netFrameWork 3.5

Me Ducer 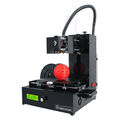
Me Ducer 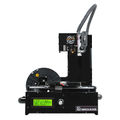
Me Ducer 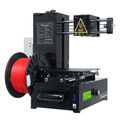
Me Ducer


How to control on LCD

1.How to print from LCD
Note:
- 1)If you do not set the temperature of extruder and hot bed in g-code, you should manually heat up extruder and hotbed to proper temperature before printing.
- 2)If you do not set letting all the axes auto home in g-code, you should manually let all the axes auto home first.
- Press the button>"Print from SD">Choose the file you want to print and press button.


2.How to let all the axes auto home
- Press button on LCD> “Prepare”>“Auto home”

3.How to move the axis and extruder motor separately
- Press the button>”Prepare”>”Move axis”>”Move 10mm/1mm/0.1mm”>”Move X/Y/Z/extruder”
Note: The extruder motor can not move unless the temperature is more than 180 degrees.


4.What if you can not move the axis with you hand
Press the button>“Prepare”>”Disable steppers”

5.How to set the temperature of extruder
Press the button>“Control”>”Temperature”>”Nozzle”>Rotate the button>Press the button


6.How to set the temperature of hot bed
“Control”>”Temperature”>”Bed”>Rotate the button


where to buy
Please click here