Difference between revisions of "433Mhz RF link kit"
From Geeetech Wiki
(→examlple code) |
(→How to buy) |
||
| (13 intermediate revisions by the same user not shown) | |||
| Line 1: | Line 1: | ||
== Introduction == | == Introduction == | ||
| − | |||
| + | The kit is consisted of transmitter and receiver, popular used for remote control. | ||
| + | |||
| + | [[File:Rf1.jpg|600px]] | ||
== Specification == | == Specification == | ||
| Line 12: | Line 14: | ||
== Wiring diagram == | == Wiring diagram == | ||
| + | [[File:Wiring111.jpg]] | ||
| − | + | ==examlple code== | |
| − | = examlple code = | ||
Transmmiter: | Transmmiter: | ||
| Line 62: | Line 64: | ||
uint8_t buf[VW_MAX_MESSAGE_LEN]; | uint8_t buf[VW_MAX_MESSAGE_LEN]; | ||
uint8_t buflen = VW_MAX_MESSAGE_LEN; | uint8_t buflen = VW_MAX_MESSAGE_LEN; | ||
| − | if (vw_get_message(buf, &buflen)) // Non-blocking | + | if (vw_get_message(buf, &buflen))//Non-blocking |
| − | + | { | |
| − | + | int i; | |
| − | + | digitalWrite(12, true); //Flash a light to show received good message | |
| − | + | Serial.print("Got: "); //Message with a good checksum received, dump it. | |
| − | + | for (i = 0; i < buflen; i++) | |
| − | + | { | |
| − | + | Serial.print(buf[i], HEX); | |
| − | + | Serial.print(" "); | |
| − | + | } | |
| − | + | Serial.println(""); | |
| + | digitalWrite(12, false); | ||
} | } | ||
| − | + | } | |
| + | |||
| + | ==How to buy== | ||
| + | Click here to buy [http://www.geeetech.com/433mhz-rf-link-kit-p-160.html 433Mhz RF link kit] | ||
Latest revision as of 03:19, 29 May 2012
Introduction
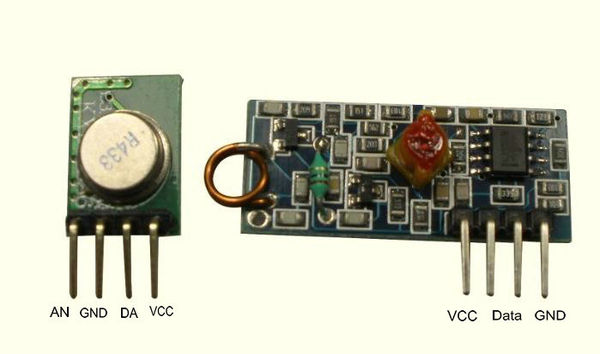
The kit is consisted of transmitter and receiver, popular used for remote control.
Specification
- Frequency: 433Mhz.
- Modulation: ASK
- Receiver Data Output: High - 1/2 Vcc, Low - 0.7v
- Transmitter Input Voltage: 3-12V (high voltage = more transmitting power)
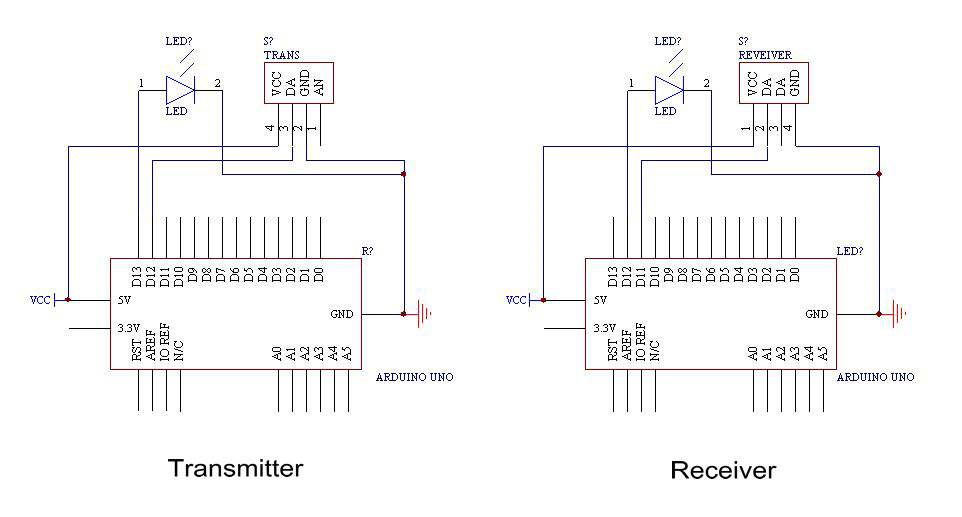
Wiring diagram
examlple code
Transmmiter:
#include <VirtualWire.h>
#undef int
#undef abs
#undef double
#undef float
#undef round
void setup()
{
   Serial.begin(9600);	  // Debugging only
   Serial.println("setup");
   // Initialise the IO and ISR
   vw_set_ptt_inverted(true); // Required for DR3100
   vw_setup(2000);	 // Bits per sec
}
void loop()
{
   const char *msg = "hello";
   digitalWrite(13, true); // Flash a light to show transmitting
   vw_send((uint8_t *)msg, strlen(msg));
   vw_wait_tx(); // Wait until the whole message is gone
   digitalWrite(13, false);
   delay(200);
}
Receiver:
#include <VirtualWire.h>
#undef int
#undef abs
#undef double
#undef float
#undef round
void setup()
{
   Serial.begin(9600);	// Debugging only
   Serial.println("setup");
   // Initialise the IO and ISR
   vw_set_ptt_inverted(true); // Required for DR3100
   vw_setup(2000);	 // Bits per sec
   vw_rx_start();       // Start the receiver PLL running
}
void loop()
{
   uint8_t buf[VW_MAX_MESSAGE_LEN];
   uint8_t buflen = VW_MAX_MESSAGE_LEN;
   if (vw_get_message(buf, &buflen))//Non-blocking
  {
   int i;
   digitalWrite(12, true);  //Flash a light to show received good message
   Serial.print("Got: "); //Message with a good checksum received, dump it.
   for (i = 0; i < buflen; i++)
  {
   Serial.print(buf[i], HEX);
   Serial.print(" ");
    }
   Serial.println("");
   digitalWrite(12, false);
   }
   }
How to buy
Click here to buy 433Mhz RF link kit

