User Guide/Introduction
Contents
What do you need for flying
Here's a short list of what is needed for flying:
- A Crazyflie quadcopter
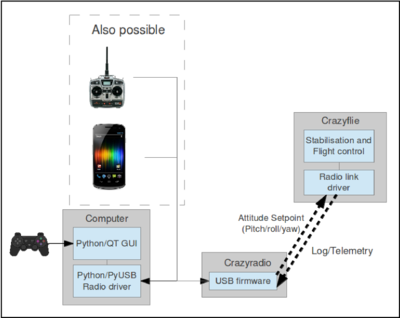
- A Crazyradio USB dongle
- A PC side application for controlling the quadcopter
- A controller for input of flight commands (joystick). Currently Playstation 3 and Xbox 360 controllers are supported out of the box, but any controller with at least 4 analog axis can be configured and used. Se the input-device page for more information.
Basic concepts
The Crazyflie is controlled from a computer using an input device such as a game controller (PS3 or Xbox 360). A USB radio dongle is used to send control data from the controller/computer to the quadcopter.
Flying
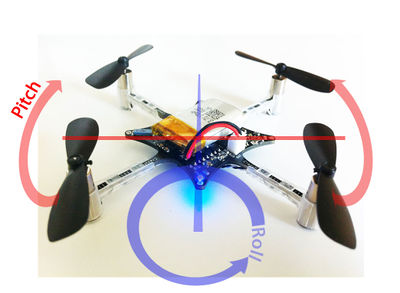
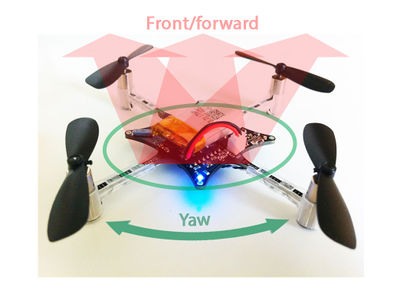
The Crazyflie has 4 different controls: roll, pitch, yaw and thrust. Changing the roll and pitch will make the quadcopter tilt to the sides and thus change the direction that it's moving in. Tilting the quadcopter forward will make it go forward and the same applies for every other direction. Note: the images below show the front as setup in X configuration. Normal (out of the box) configuration has the front inline with motor M1.
Changing the yaw will make the quadcopter spin.
Changing the yaw is normally not a good idea for beginners since this will also change what direction is forward for the quadcopter.
The thrust is used to control the altitude of the quadcopter.
Getting started
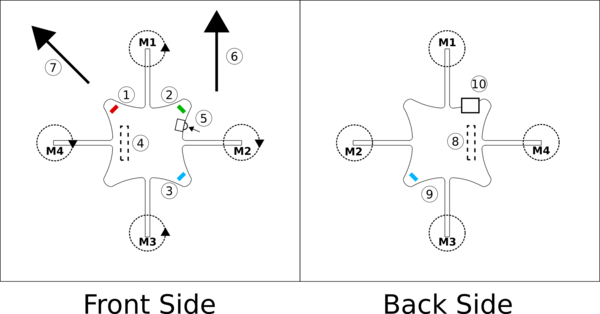
1.Red LED - Shows system alive and charge status
2.Green LED - Shows radio communication and charging status.
3.Blue LED - Shows power on status
4.Expansion - Can be used to expand functionality by adding hardware
5.Power push-button - Push button to switch the Crazyflie on/off (Note that this is a push button, not a sliding button)
6.Front direction when flying in normal configuration
7.Front direction when flying in X configuration, blue LED is at the tail.
8.Expansion - Can be used to expand functionality by adding hardware
9.Blue LED - Shows power on status
10.uUSB charging - Used to charge the battery
How to get flying
- Start up the application
- Insert the joystick and Crazyradio
- Before you press connect make sure that the joystick is working as expected and that the thrust is zero. The joystick values should be visible in the flight data box under target.
- Press Connect
- Wait for the scanning to complete
- Double-click the Crazyflie you want to connect to. There's one debug URI for UI testing so you should connect to the URI that begins with radio://XX/XX/XX
- The client will now connect to the Crazyflie and handshake
8One the handshake is done you can start flying the Crazyflie. Remember the most tricky part is the thrust so start out easy…
LED indications
The Crazyflie has four LEDs mounted, two blue, one red and one green. The two blue LEDs indicate that the system is powered and the red/green shows operation.
When the Crazyflie is powered the two blue LEDs will be lit up and the red/gren LED will blink shortly indicating that the bootloader is executing. After this the firmware will start up.
During firmware startup:
Green LED
Tests passed: 5 quick flashes Red LED
Tests failed: 5 quick flashes. This can be caused by too much movement of the Crazyflie when powering it on. If you get it place it on a stable surface and try again.
When USB is connected:
Green LED
Charging: Blinking at 1 Hz with a duty cycle showing the battery charge level. The longer on time the more charged the battery is.
Fully charged: LED steady lit
Red LED
System alive: 1 Hz heart beat
When USB is not connected:
Green LED
Radio communication: LED blinks for every packet received. When the LED starts to blink slower this indicates that the radio reception is getting bad Red LED
System alive: 1 Hz heart beat
Sensors calibrated: 2 Hz heart beat. Crazyflie now ready to fly.
Charging needed: Red LED steadily lit. “Fly back to base!”


