3D Printer Troubleshooting Guide to 19 Common 3D Printing Problems|Part One
Frustrated with Fused Filament Fabrication? Read our 3D printer troubleshooting guide to the most common 3D printing problems and their solutions.
You’ve checked the model, and seen countless others make it without issue, but try as you might it just won’t print. What is it that keeps going wrong? This article will help you to quickly diagnose your 3D printing issues, and find the solution with our 3D printer troubleshooting guide. Discover how and when these 3D printing problems occur, and the steps you can take to avoid them in the future.
19 Common 3D Printing Problems: Overview
If you don’t know the name of your problem, you can refer to the following 19 problems.
1. Warping
2. Elephant Foot
3. More First Layer Problems
4. Layer Misalignment
5. Missing Layers
6. Cracks in Tall Objects
7. Pillowing
8. Stringing
9. Under-Extrusion
10. Over-Extrusion
11. Shifting Layers
12. Blocked Bowden Nozzle
13. Snapped Filament
14. Stripped Filament
15, Broken Infill
16. Ghosting of the Internal Structure
17. Gaps Between Infill and Outer Wall
18. Non-Manifold Edges
19. Model Overhangs
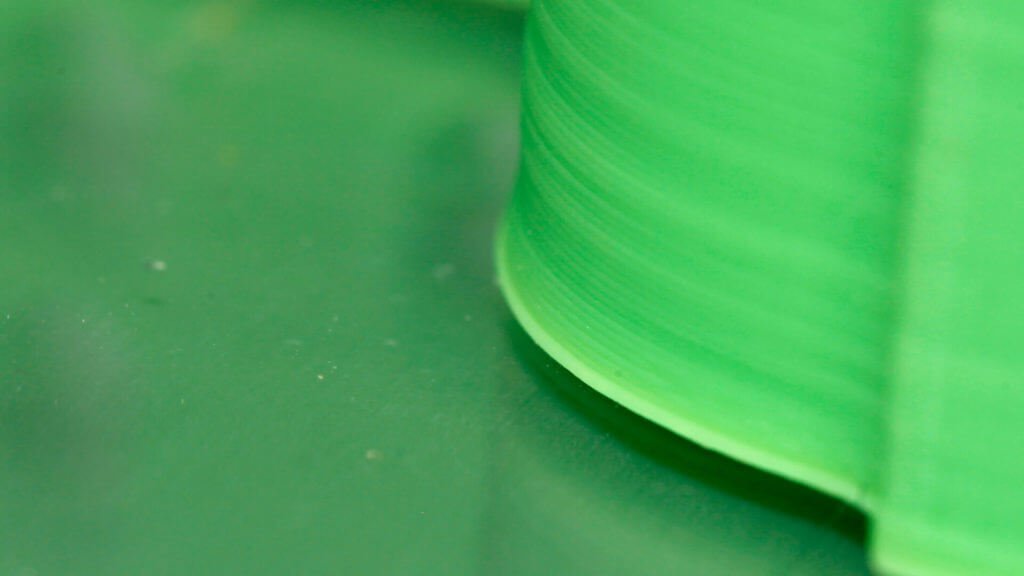
3D Printing Problems #1: Warping
What’s the 3D Printing Problem?
At the base of the model, the print bends upwards until it’s no longer level with the print platform. This can also result in horizontal cracks in the upper parts.
What’s Causing this 3D Printing Problem?
Warping is common as it’s caused by a natural characteristic of the plastic. As the ABS or PLA filament cools it starts to contract very slightly; the problem of warping arises if the plastic is cooled too quickly.
3D Printer Troubleshooting: Warping
- Use a heated print platform. The easiest solution is to use a heated print platform and set the temperature to a point just below the plastic melting point. This is called the “glass transition temperature”. If you get that temperature right then the first layer will stay flat on the print platform. The print platform temperature is often set by the slicer software. You’ll normally find the recommended temperature for your filament printed on the side of the packaging or the spool.
- Apply glue. If you still find your print lifting at the edges then apply a tiny amount of stick glue evenly on the bed to increase adhesion.
- Try a different platform type. Change your print bed to one that offers better adhesion. Manufacturers such as Lulzbot use a PEI (Polyetherimide) print surface that offers excellent adhesion without glue. XYZPrinting supplies a textured tape in the box with some of their printers, basically a large sheet of masking tape, and again adding this works excellently, although only with nonheated print platforms. Zortrax 3D printers have a perforated print bed, models weld themselves to this surface eliminating the issue.
- Level the Print platform. Print platform calibration can be another cause, run through the calibration process to check that the bed is level and nozzle height is correct.
- Increase contact. Increasing the contact between the model and the bed is an easy fix and most print software has the option to add rafts or platforms.
- Adjust advanced temperature settings. If all else fails then you’ll need to take a look at your advanced print settings both on your printer and in your print software. Try increasing the print bed temperature by increments of 5 degrees.
In the slicer software take a look at the fan cooling, this is usually set so the cooling fans switch to full power at a height of around 0.5mm, try extending this to 0.75 to give the base layers a little more time to cool naturally.
Even if your printer has a heated print platform, it’s always recommended that you use glue and regularly calibrate the bed level.
3D Printing Problem Checklist: Warping
- Use a heated print platform
- Add Stick glue to the print platform
- Swap from glass to an adhesive print bed
- Calibrate print bed
- Add platforms or rafts
- Adjust advance the temperature and fan settings
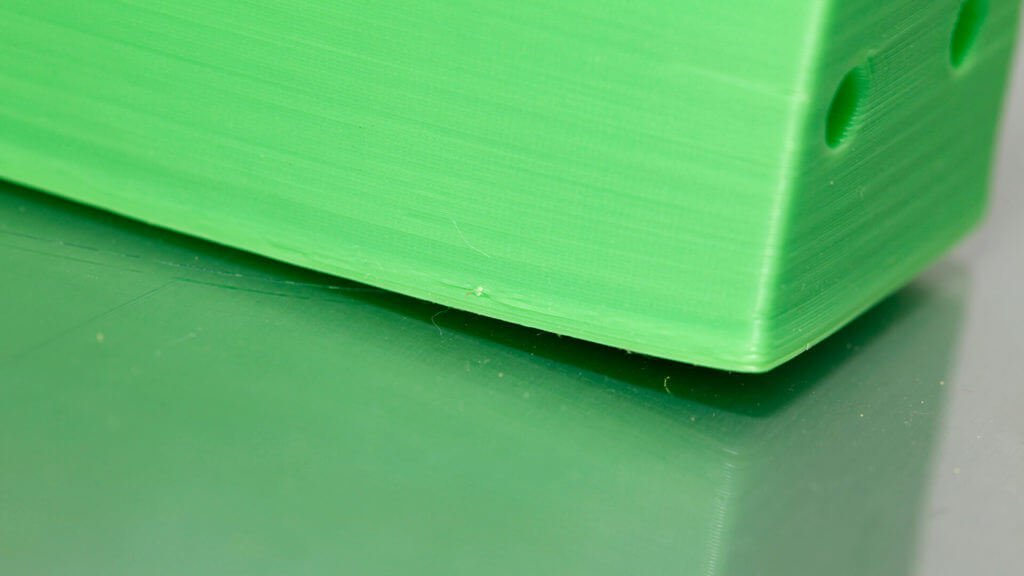
3D Printing Problems #2: Elephant Foot
What’s the 3D Printing Problem?
The base of the model is slightly bulging outwards, otherwise known as the “elephant foot”
What’s Causing this 3D Printing Problem?
This ungainly effect can also be caused by the weight of the rest of the model pressing down the first layers when the lower layers haven’t had time to cool back into a solid – particularly when your printer has a heated bed.
3D Printer Troubleshooting: Elephant Foot
- The right balance. To stop elephant foot appearing in your 3D prints the base layers of the model need to be cooled sufficiently so that they can support the structure above, but if you apply too much cooling to the base layers you can create warping. Getting the balance right can be tricky, start by lowering the temperature of the print platform by intervals of 5 degrees, (within +/- 20 degrees of the recommended temperature). If your Bottom / Top Thickness is set to 0.6mm then start the fan after the fan at a slightly lower height.
- A level base. More often than not the majority of print issues can be traced back to the level of the print platform. Each printer has a slightly different technique for print platform leveling. Start by using your printer manufacturer’s recommended procedure. Then print a calibration cube and just watch how the filament is laid down. From printing the cube you should be able to see if the filament is being laid down evenly, if the nozzle is too close to the print platform and scraping through the molten filament, or too high and causing the filament to blob.
- Raise the nozzle. Just raising the height of the nozzle slightly can often help, but be careful too high and it won’t stick to the platform.
- Chamfer the base. If all else fails then another option is to chamfer the base of your model. Of course, this is only possible if you have either designed the model yourself or you have access to the original file. Start with a 5mm and 45º chamfer, and experiment to get the best result.
3D Printing Problem Checklist: Elephant Foot
- Balance print platform temperature and fan speed
- Level the print platform
- Check the nozzle height
- Chamfer the model base
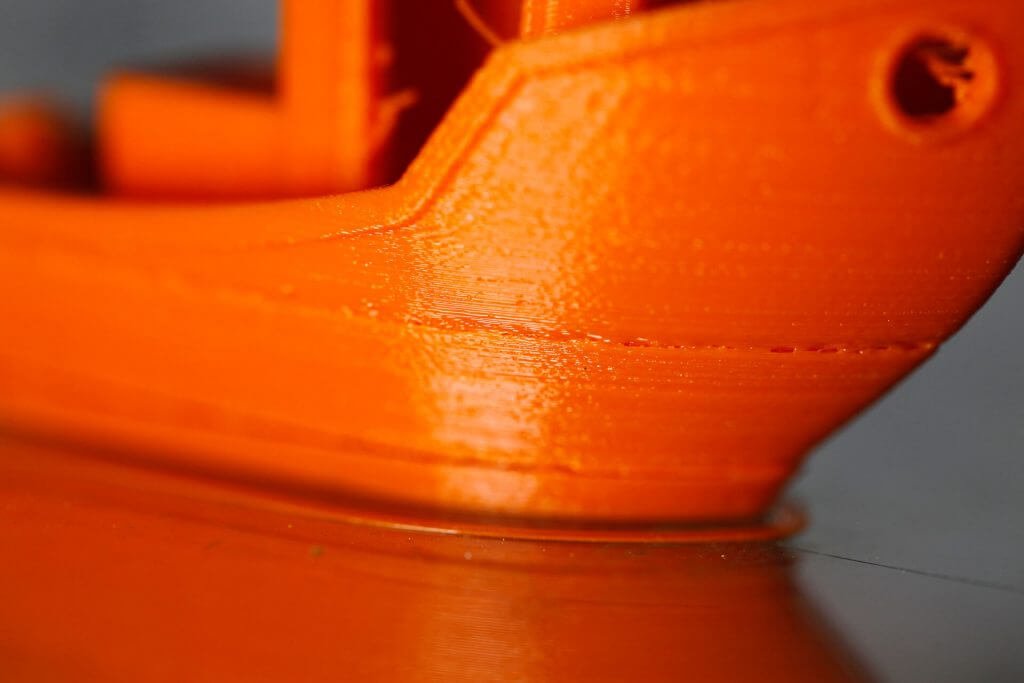
3D Printing Problems #3: More First Layer Problems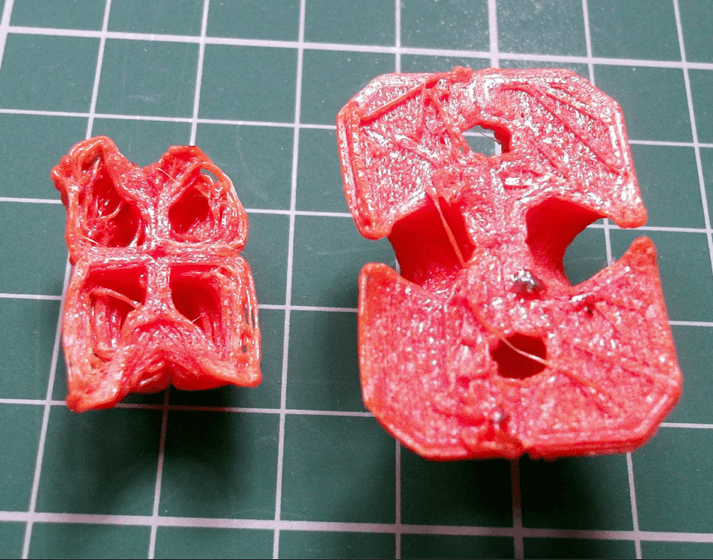
What’s the 3D Printing Problem?
The first layer does not stick properly, and some parts come loose. There are unwanted lines at the bottom.
What’s Causing this 3D Printing Problem?
These 3D printing problems are typical signs that the print bed hasn’t been leveled properly. If the nozzle is too far away from the bed, the bottom surface often shows unwanted lines, and/or the first layer does not stick. If the nozzle is too close, blobs may be the result.
Also important: the print bed has to be as clean as possible. Fingerprints on the plate can prevent the first layer from sticking to the plate.
3D Printer Troubleshooting: More First Layer Issues
- Level the print bed. Every printer has a different process for print platform leveling, some like the latest Lulzbots utilize an extremely reliable auto-leveling system, others such as the Ultimaker have a handy step-by-step approach that guides you through the adjustment process, and then there’s the Prusa i3 that takes skill and determination.
- Adjust the nozzle height. If the nozzle is too high then the filament won’t stick to the platform, too low and the nozzle will start to scrape the print off.
- Clean the print platform. Every so often it’s a good idea to give the glass print platform a good clean, especially if you apply glue. The grease from your fingerprints and the excessive build-up of glue deposits can all contribute to the non-stickiness of the print platform.
- Add glue. Applying a thin layer of glue to the print platform will help add a little more adhesion if you do this make sure you give the bed a clean at regular intervals as the over-application of glue can have the reverse of the desired effect.
- Textured sheet for cold print beds. On cold print platforms, a common solution is to apply a stick-on film or sheet that increases the adhesive properties of the print platform.
3D Printing Problem Checklist: More First Layer Issues
- Level the print platform
- Check nozzle height
- Clean print platform
- Add Glue
- Textured sheets for cold platforms
3D Printing Problems #4: Layer Misalignment
What’s the 3D Printing Problem?
Some layers in the middle of the objects have shifted.
What’s Causing this 3D Printing Problem?
The printer belts aren’t well-tightened. The top plate isn’t fastened and wobbles around independently of the bottom plate. One of the rods in the Z-axis is not perfectly straight.
3D Printer Troubleshooting: Layer Misalignment
- Check the belts. Start by checking each of the belts is tight but not over-tight. You should feel a little resistance from the two belts as you pinch them together. If you find that the top section of the belt is tighter than the bottom then this is a surefire sign that they need a tweak and tighten.
- Check the top plate. Check the top plate and all rods and attachments at the top of the printer and make sure everything is tight and aligned.
- Check the Z-axis rods. Many printers use threaded rods rather than lead screws and although these do the job they do tend to bend over time. Don’t worry about dismantling your printer to see if they’re straight, simply use software such as ‘Printrun’ to move the print head up or down. If one of the Z-axis rods is bent you’ll instantly see. Unfortunately, it’s almost impossible to accurately straighten a rod once it’s bent, but on the upside, it’s a good excuse to replace the old threaded rods with lead screws.
3D Printing Problem Checklist: Layer Misalignment
- Check the tension in the belts
- Check there’s no movement in the top plate
- Make sure the Z-axis rods are straight
3D Printing Problems #5: Missing Layers
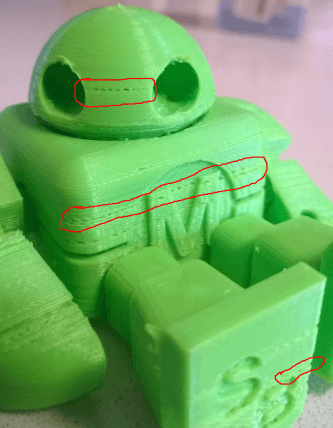
What’s the 3D Printing Problem?
There are gaps in the model because some layers have been skipped (in part or completely).
What’s Causing this 3D Printing Problem?
The printer failed to provide the amount of plastic required for printing the skipped layers. This is called (temporary) under-extrusion. There may have been a problem with the filament (e.g. the diameter varies), the filament spool, the feeder wheel, or a clogged nozzle.
Friction has caused the bed to temporarily get stuck. The cause may be that the vertical rods are not perfectly aligned with the linear bearings.
There is a problem with one of the Z-axis rods or bearings. The rod could be distorted, dirty, or had been oiled excessively.
3D Printer Troubleshooting: Missing Layers
- Mechanical check. It’s good practice to give your 3D Printer the once-over now and again and the appearance of gaps in your 3D print is always a good sign that now is the time to give your 3D printer some love and attention. Start by checking the rods and make sure that they’re all seated into either bearings or clips and haven’t popped out, shifted, or moved even slightly.
- Rod alignment check. Make sure that all rods are still in perfect alignment and haven’t shifted. You can often tell by switching off the power (or disabling steppers) and then gently moving the print head through the X and Y axes. If there is any resistance to the movement then something is wrong and it’s usually pretty easy to tell if this is due to misalignment, a slightly bent rod, or one of the bearings.
- Worn bearing. When bearings go they usually let you know about it by creating an audible din. You should also be able to feel the uneven motion in the print head and when printing the machine looks like it’s vibrating slightly. If this is the case unplug the power and move the print head through the X and Y to locate the region of the broken bearing.
- Check for oil. Lubricating the joints is easy to forget, but keeping everything well-oiled is essential to the smooth running of the machine. Sewing machine oil is ideal and can be purchased for almost any haberdashery at a relatively inexpensive price. Before you go applying liberally just check that the rods are clean and free of dirt and printing debris, a quick wipe of the rods before applying the fresh coat of oil is always a good idea. When all rods look clean just dab on a little, but not too much. Then use print such as Printrun to move the head through the X and Y axis to make sure that the rods are evenly covered and moving smoothly. If you add a little too much oil don’t worry just wipe some off with a lint-free cloth.
- Under-Extrusion. The final issue could be under-extrusion and finding the solution for this can be cumbersome.
3D Printing Problem Checklist: Missing Layers
- Check over the mechanics and make sure everything is tight
- Double-check the printer’s construction and alignment
- Listen out for worn bearings and bent rods
- Add a little oil to keep things running smooth
3D Printing Problems #6: Cracks In Tall Objects

What’s the 3D Printing Problem?
There are cracks on the sides, especially on taller models. This can be one of the most surprising issues in 3D Printing as it tends to manifest itself in larger prints, and usually whilst you’re not looking.
What’s Causing this 3D Printing Problem?
In higher layers, the material cools faster, because the heat from the heated print bed doesn’t reach that high. Because of this, adhesion in the upper layers is lower.
3D Printer Troubleshooting: Cracks In Tall Objects
- Extruder temperature. Start by increasing the extruder temperature; a good start would be to increase it by 10ºC. On the side of your filament box you’ll see the working hot end temperatures, try to keep the temperature adjustment within these values.
- Fan direction and speed. Double-check your fans, make sure that they’re on and aimed at the model. If they try reducing their speed.
3D Printing Problem Checklist: Cracks In Tall Objects
- Check the hot end temperature and raise it at 10-degree intervals
- Check the position and speed of the cooling fans
3D Printing Problems #7: Pillowing
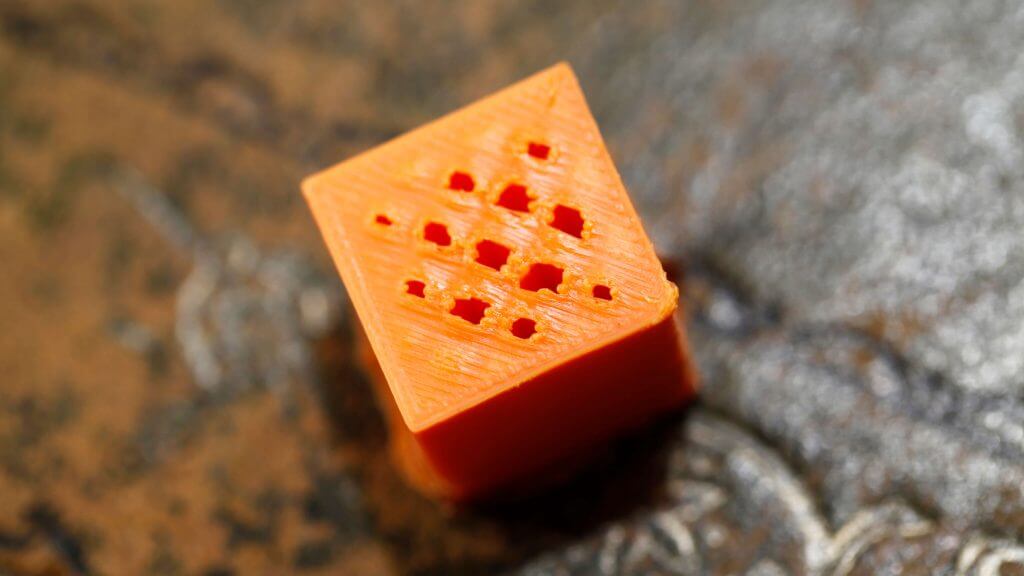
What’s the 3D Printing Problem?
The top surface of the print shows unsightly bumps or even holes.
What’s Causing this 3D Printing Problem?
The two most common causes are improper cooling of the top layer and that the top surface isn’t thick enough.
3D Printer Troubleshooting: Pillowing
- Filament size. More common with 1.75 mm filament. Pillowing is an issue that can affect all 3D printers, however, it’s far more common on those using 1.75 mm filament over 2.85mm.
- Check the fan position. Cooling is normally the issue start by checking your fans. As the print starts your printer fans will be set to low or off, after the first few layers have printed they should kick into action. Check that the fans around the hotend start to spin, then as the print finishes check the fans are all good and working. If all seems OK just double-check that the direction of the fans is correct and that they’re pushing cool air toward your print and not elsewhere.
- Set fan speed in G-Code. Another cooling issue happens when each successive top layer of molten plastic is applied. As it covers the inner support structure it needs to be cooled quickly to avoid falling into the holes between the supports. The speed of the fans can be adjusted in the G-Code, a common G-Code for Fan On is M106 and is M107 Fan Off. You then just need to the Fan speed to maximum for those top layers.
An example would be a 1cm x 1cm cube printer at 0.1mm layer height. The G-Code, in this case, outputs through CURA for the Prusa i3, we can look through the code and see that there are 97 layers. Knowing that we have a ‘Bottom / Top Thickness setting’ of 0.6mm we can look back to; LAYER:91 than in the line after adding M106 S255. M106 sets the fan going and S255 sets it to full blast. - Increase top layer thickness. The easiest solution is to increase the top layer thickness. Most applications will enable you to do this in the advanced section, under the ‘Bottom / Top Thickness setting’. You’re aiming for at least 6 layers of material normally and up to 8 for smaller nozzles and filaments. If your layer height is therefore set to 0.1mm then set the ‘Bottom / Top Thickness setting’ to 0.6mm. If the effect of pillowing still exists then increase to 0.8mm.
3D Printing Problem Checklist: Pillowing
- Go large and increase the filament size
- Make sure the fans are up to speed and position
- Manually set the fan speed
- Increase the top layer thickness
3D Printing Problems #8: Stringing
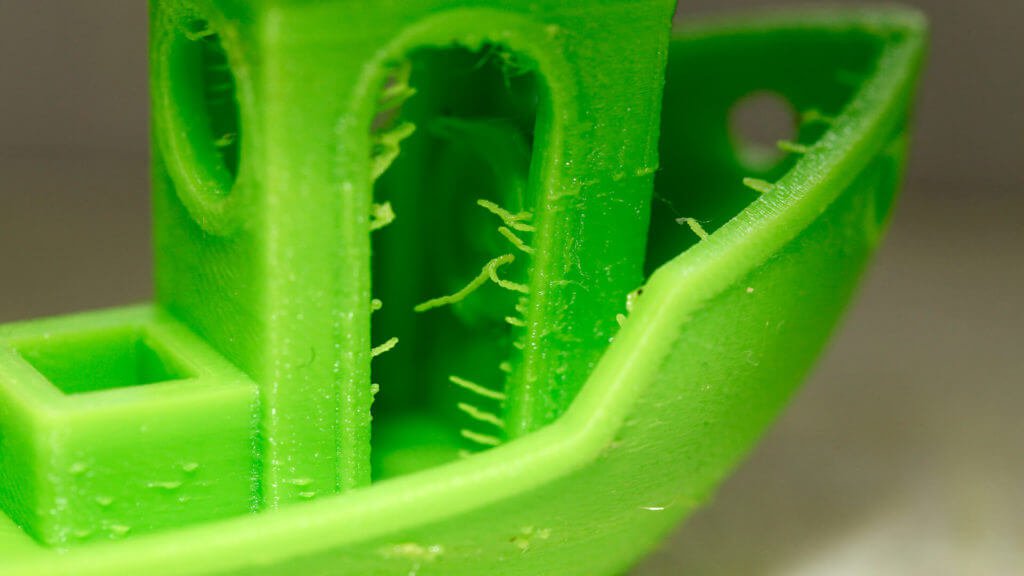
What’s the 3D Printing Problem?
There are unsightly strings of plastic between parts of the model.
What’s Causing this 3D Printing Problem?
When the print head moves over an open area (otherwise known as travel move), some filament has dripped from the nozzle.
3D Printer Troubleshooting: Stringing
- Enable Retraction. Retraction is an important factor when it comes to quality of finish and can be enabled through most slicing software. Its function is pretty simple and works by retracting the filament back into the nozzle before the head moves. The idea is that it avoids molten filament from trailing behind the head creating thin strings in its wake.
- One-click retraction activation. Most applications such as Cura offer a one-click activation option, this uses a set of default parameters and for the most part, is perfectly adequate. However, if you want a few more options there are often more settings buttons. Here you can adjust the minimum travel of the head before retraction is activated.
- Minimum travel (mm). Reducing the minimum travel is usually the quickest fix for stringing if the standard retraction isn’t doing the job. Drop the value in 0.5mm until stringing is stopped. Activating retraction will increase your print speeds.
- Just cut them off. This isn’t the most elegant of solutions but simply taking a scalpel to the strings is quite often the quickest and easiest solution, and has the benefit that it doesn’t increase print times.
3D Printing Problem Checklist: Stringing
- Enable retraction
- Adjust the minimum travel before retracting starts
- Just clean the print with a scalpel
3D Printing Problems #9: Under-Extrusion

What’s the 3D Printing Problem?
Under-extrusion is when the printer cannot supply the material needed (or as fast as needed). Under-extrusion results in thin layers, layers with unwanted gaps, or missing layers entirely.
What’s Causing this 3D Printing Problem?
There are several possible causes. First, the diameter of the filament used does not match the diameter set in the slicing software. Secondly, the amount of material that is extruded is too low because of faulty slicer software settings. Alternatively, the flow of the material through the extruder is restricted by dirt in the nozzle.
3D Printer Troubleshooting: Under-Extrusion
- Check the filament diameter. Start with the simplest issue, have you set the correct filament diameter in the slicing software? If you’re unsure about the diameter the value along with the recommended temperature is usually printed on the box.
- Measure the filament. If you’re still not getting the results you want and filament flow is the issue, then use a set of calipers to double-check the filament diameter. You should be able to tweak the filament diameter settings accurately in the slicer software settings.
- Check the head. After printing, most printers will lift the printhead away from the print base. Quickly check that the nozzle is clear from a build-up of filament and dirt.
- Set the extrusion multiplier. If there is no mismatch between the actual filament diameter and the software setting, then the extrusion multiplier (or flow rate or flow compensation) setting may be too low. Each slicer application will handle this slightly differently but the principle is to increase the setting in steps of 5% and then restart the print process.
In Simplify3D open the Edit Process Settings dialog and go to the Extruder tab – the Extrusion multiplier setting of 1.0 corresponds to 100%; In Cura open the Material tab and increase the Flow setting (you may need to enable the Flow setting through the Preferences dialog).
3D Printing Problem Checklist: Under-Extrusion
- Check the filament diameter
- Use calipers to measure the filament diameter
- Check that the hot end is clear
- Adjust the extrusion multiplier at 5% intervals
We will continue to provide another 10 common issues concerning 3D printing. Please stay tuned to our blog!